Key Takeaways
- Django-crispy-forms moves form layout and rendering logic out of templates into Python code.
- Installation is straightforward: add the package to INSTALLED_APPS and import a CSS framework if needed.
- The {% crispy %} template tag renders a complete form, including CSRF token, with one line.
- FormHelper lets developers add submit buttons, form actions, and methods directly in the form class.
- The Layout class and bootstrap-based objects allow detailed control over field grouping, styling, and tabs.
Installation
Installation of django-crispy-forms is quite standard. You will need to use a package manager "pip" or "easy_install", then add an installed application 'crispy_forms' to the INSTALLED_APPS list. If you plan on using Bootstrap (or any other CSS framework), then you will also have to import it to the project. That’s it when it comes to a basic installation process - in order to learn more about the details and more advanced options check out the official django-cripsy-forms documentation.
crispy template tag - a one line form
Now I’ll show you how to utilize django-crispy-forms to move all the form’s logic and layout from templates to Python code. At first you need to create a simple form and place it in a HTML template by using the {% crispy %} template tag. Template tags are processed by Django’s template engine in order to perform various tasks, in this case - to output the form’s HTML based on the code behind it.
Form’s code:
class PersonalDataForm(forms.Form):
    first_name = forms.CharField(required=True, max_length=255)
    last_name = forms.CharField(required=True, max_length=255)
    email = forms.EmailField(required=True)
    phone = forms.CharField(required=True, max_length=200)
    address = forms.CharField(max_length=1000, widget=forms.Textarea())
The form’s instance needs to be put in the template context .In this example the variable name will be "form". Then you need to load crispy_forms_tags and use the {% crispy {%} tag to render the form:
{% load crispy_forms_tags %}
<h1>This Is My Crispy Form:</h1>
{% crispy form %}
This is what the rendered form should look like:
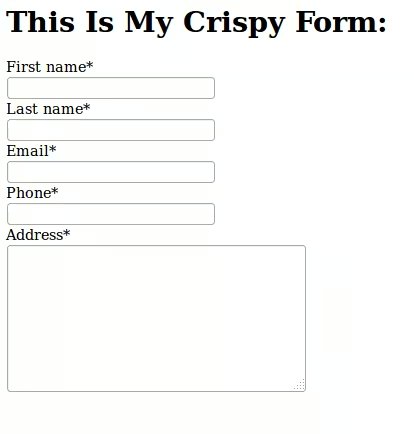
The HTML’s <form method="post"> and <input type=”hidden” name=”csrfmiddlewaretoken” value=”somevalue” /> markers are rendered automatically. Each of the fields will have the following structure:
<div id="div_id_first_name" class="control-group">
<label for="id_first_name" class="control-label requiredField">
    First name<span class="asteriskField">*</span></label>
<div class="controls">
<input class="textinput textInput" id="id_first_name" maxlength="255" name="first_name" type="text" />
</div>
</div>
As you can see, crispy forms use bootstrap classes by default, which affect this properly arranged, but simple layout. A Django form (without any additional styles) is displayed as a set of fields which labels are arranged one by one in the same line:

Crispy-forms by default displays a form in a much nicer way.
A similar effect can be achieved by using a "crispy" filter instead of template tag, but then it will be necessary to add a <form> marker and a csrf token:
<form method="post">
    {% csrf_token %}
    {{ form|crispy }}
</form>
Where’s the button?
Created form lacks an approval button and the address (ie. action) to which we would like to send the data from completed fields.
Right now you will need to use something very essential for django-crispy-forms, which is a helper. In the form’s constructor you’ll have to add a previously imported FormHelper class. This will allow you to use all of the previously mentioned modifications of form.
At the beginning you’ll have to add id, button, action and method ("post" method is also by default added to the <form> marker):
from crispy_forms.helper import FormHelper
from crispy_forms.layout import Submit

class PersonalDataForm(forms.Form):
    (...)
    def __init__(self, *args, **kwargs):
        super(PersonalDataForm, self).__init__(*args, **kwargs)
        self.helper = FormHelper()
        self.helper.form_id = 'id-personal-data-form'
        self.helper.form_method = 'post'
        self.helper.form_action = reverse('submit_form')
        self.helper.add_input(Submit('submit', 'Submit'))
As a result, a button will appear under the form.

In the code you’ll also see parameters that you previously set.
<form id=”id-personal-data-form” action="/submit" method="post">Form’s layout
At this moment you’ll try to affect the layout of the form by using, among others, bootstrap classes.
from django import forms
from django.core.urlresolvers import reverse
from crispy_forms.bootstrap import Field, InlineRadios, TabHolder, Tab
from crispy_forms.helper import FormHelper
from crispy_forms.layout import Submit, Layout, Div, Fieldset

class PersonalDataForm(forms.Form):
    first_name = forms.CharField(required=True, max_length=255)
    last_name = forms.CharField(required=True, max_length=255)
    email = forms.EmailField(required=True)
    phone = forms.CharField(required=True, max_length=200)
    address = forms.CharField(max_length=1000, widget=forms.Textarea())
    more_info = forms.CharField(max_length=1000, widget=forms.Textarea())
    color = forms.TypedChoiceField(
        label="Choose color",
        choices=((0, "Red"), (1, "Blue"), (2, "Green")),
        coerce=lambda x: bool(int(x)),
        widget=forms.RadioSelect,
        initial='0',
        required=True)

    def __init__(self, *args, **kwargs):
        super(PersonalDataForm, self).__init__(*args, **kwargs)
        self.helper = FormHelper()
        self.helper.form_id = 'id-personal-data-form'
        self.helper.form_method = 'post'
        self.helper.form_action = reverse('submit_form')
        self.helper.add_input(Submit('submit', 'Submit', css_class='btn-success'))
        self.helper.form_class = 'form-horizontal'
        self.helper.layout = Layout(
            Fieldset('Name',
                Field('first_name', placeholder='Your first name', css_class="some-class"),
                Div('last_name', title="Your last name"),),
            Fieldset('Contact data',
                'email',
                'phone', style="color: brown;"),
            InlineRadios('color'),
            TabHolder(Tab('Address', 'address'), Tab('More Info', 'more_info')))
After that your form will look like this:
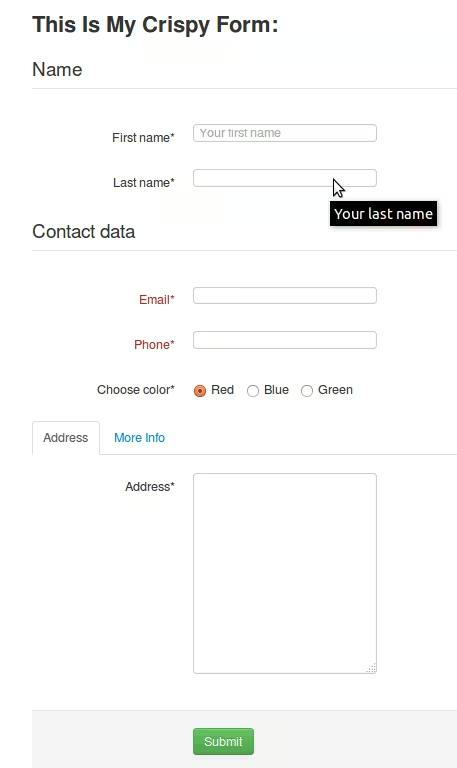
The "form-horizontal" class added to the form ensured that fields in a column are arranged one by one. Then, by using the Layout class, you’ll define the appearance details of specific form fields. Some of those fields are grouped, particular CSS classes and styles (such as inline, placeholder, title, etc) are added to the generated HTML.The last two fields are organized into tabs. All of this was possible thanks to such imported objects as for instance Field, Div or Fieldset, Tab, which can be successfully nested.
This is only a small part of django-crispy-forms capabilities. Of course, there are more of them - for example "helper" can be used in django views, it can be overwritten, you could even create your own templates for specific fields in a form. You could also directly define the HTML code to be added to the form. If you’re interested in django-crispy-forms, once again I encourage you to read its official documentation.
FAQ

Katarzyna Pieczyńska
Team Member
view more posts by Katarzyna Pieczyńska