.svg)
.webp)
But no worries! Heroku, a well-established PaaS provider comes to the rescue. In this detailed guide, you are going to learn how to seamlessly move dockerized application stack of Django, PostgreSQL, React and Amazon S3 bucket for static files to a production environment with Heroku-provided tools. And it’s gonna be super easy!
So, without further ado let’s start, shall we?
Important note: this guide assumes that you’re familiar with Docker and docker-compose.
Head into your workspace directory and clone this base GitHub repository:
$ git clone --recurse-submodules\ https://github.com/sleeske/heroku-polls-main.git && cd\ heroku-polls-main
As you can see, this repository contains only docker-compose.yml file (to orchestrate multiple containers during local development) and two submodules - with backend and frontend code respectively.
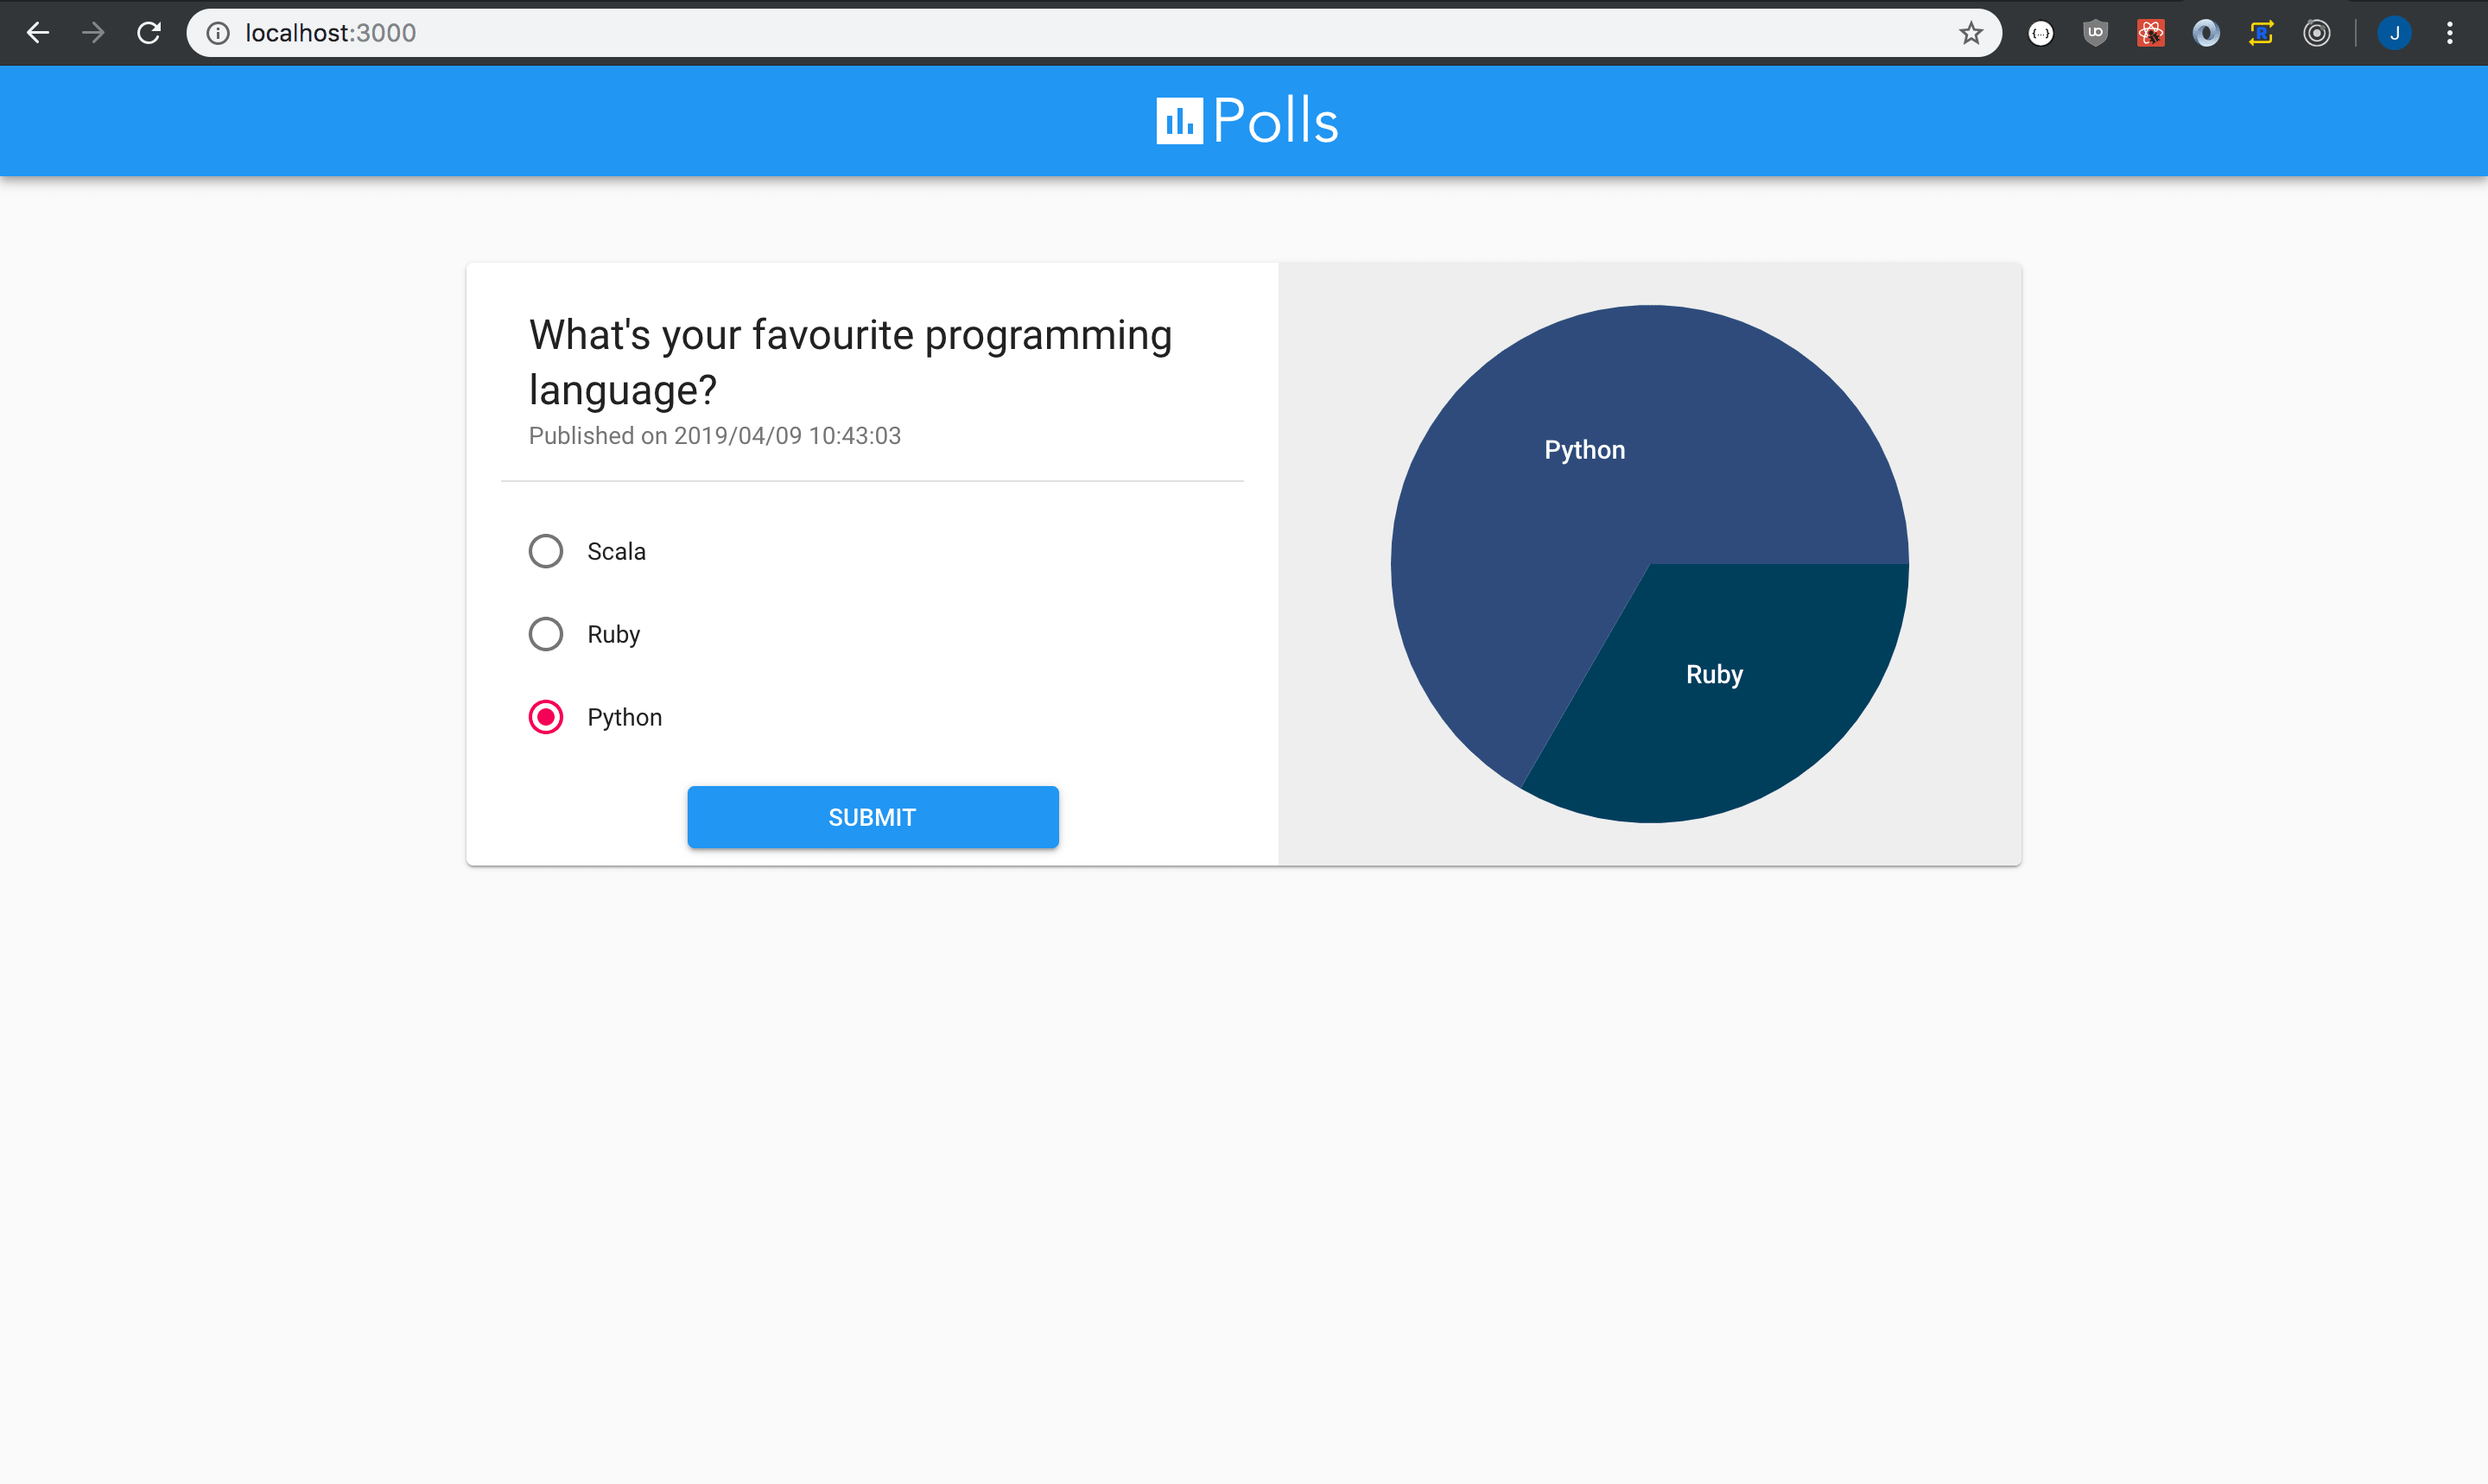
If you wish to run them locally follow the instructions in README.md files. The project is inspired by the official Django tutorial, which means it features a polling app but exposed as REST API. In the admin (http://localhost:8000/admin/) add a sample question and several choices to it. In the frontend app, you should see the newly added question, and be able to vote for any of the related options. Once you cast at least one vote, a pie chart shall appear to the right.
We’ve got everything up and running, so it’s time to deploy it and show it to the world!
Step One - register on Amazon AWS
Go to Amazon Web Services and hit that “Sign up” button in the top right corner of your screen. If you do not have an account yet follow the instructions on the page to create one, otherwise select “Sign in to an existing AWS account” and provide your credentials to sign in.
Step Two - create user, group and bucket
The bucket will hold static files (i.e. .css and .js) required by e.g. Django Admin to work properly. The extra user we are about to create is going to have all the permissions required to interact with our S3 bucket on behalf of our Django app.
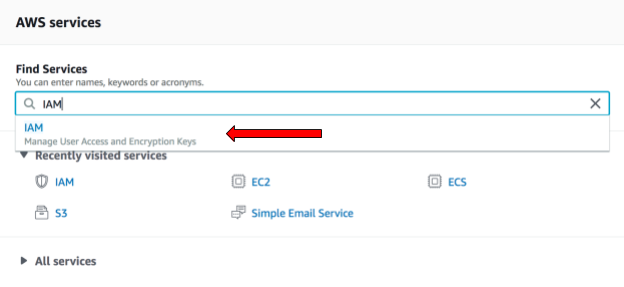
In the “Find Services” section of your AWS dashboard screen type “IAM” and click on the search result:
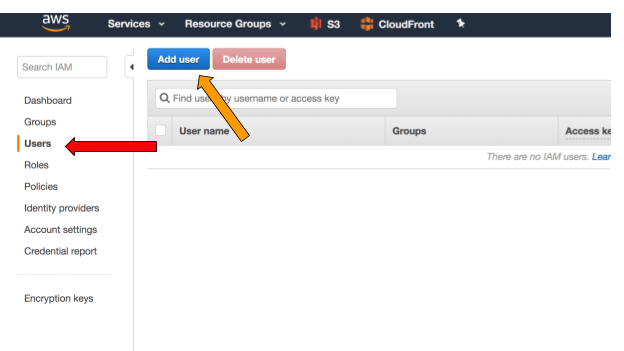
Click on the “Users” item in the left-hand menu (red arrow), then click the “Add user” button (orange arrow).
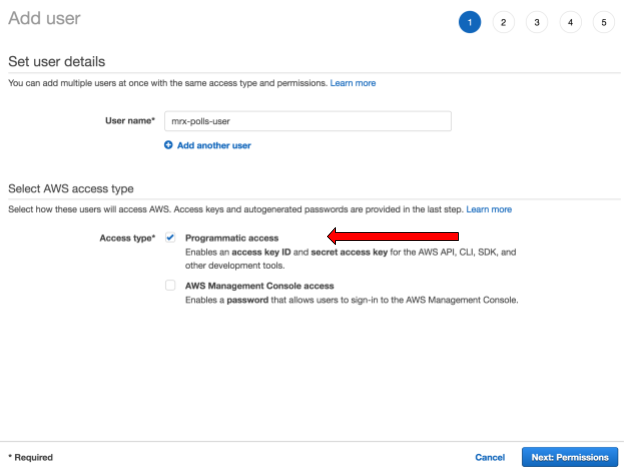
Select the username and set access type to “Programmatic access” - that will allow us to retrieve AWS secret access key and AWS access key id later on. Click “Next: Permission”.
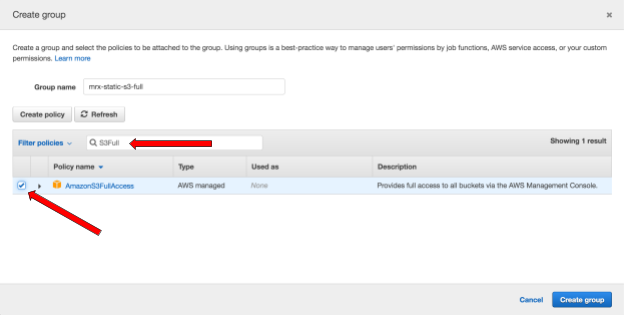
It is time to add our user to a group! Select “Create group” to prompt a dialog. Then choose a group name (it should be descriptive) and from permissions list select “AmazonS3FullAcces” (search bar to the rescue!). Hit “Create group” and once dialog is gone follow through with the wizard’s default settings all the way to the final (fifth) step.
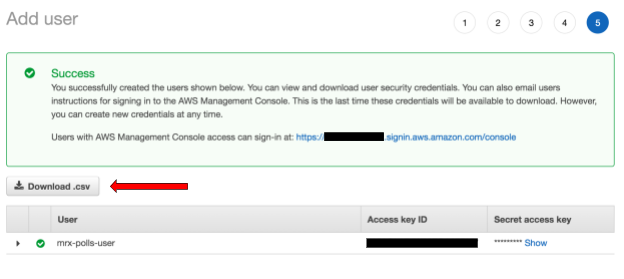
On the summary page click the “Download .csv” button. Keep in mind that data in that file is sensitive so better listen to papa Gandalf!

Once a download is completed hit “Close” to get back to dashboard main page.
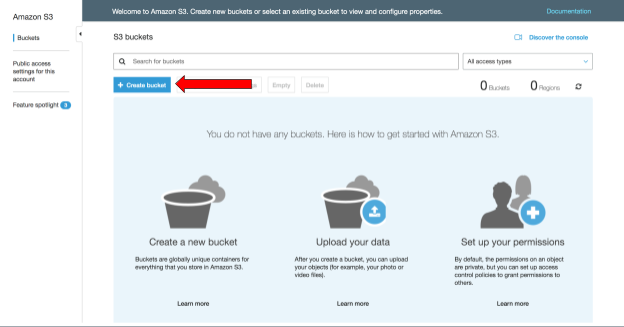
Congrats, you’ve just created your first IAM user! One final step ahead of us in this part of this guide is to create an S3 Bucket!
Head to S3 service (use an aforementioned “Find Services” search bar to find it) and hit “Create bucket” to open another dialog.
In the first section, titled “Name and region” select a unique name for your bucket and region it should be set up in. The one closest to your actual location is probably the best for this tutorial.

Skip the second step (“Configure options”) without touching the defaults and move on to the third one - permissions. Make sure to untick both options under the “Manage public access control lists (ACLs) for this bucket”. Otherwise, access to bucket might get denied when executing collectstatic command. Hit next, review your settings, and if everything is OK - finalize the process.

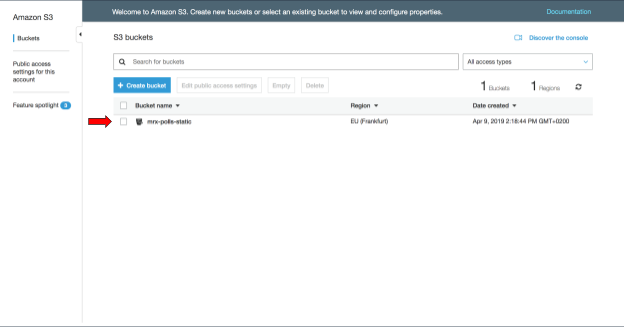
A couple of seconds later your freshly created bucket should be listed. Keep in mind its name, you’re gonna need it later in the tutorial.
Step Three - register on Heroku.com
This is pretty straightforward. Head to Heroku login page and register your free account or if you already have one - just log in ;)
Step Four - download and install Heroku CLI
CLI stands for Command Line Interface, a tool that allows us to interact with Heroku through our terminal. Although Heroku has a pretty sweet and intuitive UI dashboard available at its Dashboard we are not going to use it until later on in this tutorial.
For instructions on how to download, install and verify the installation of the CLI visit this Heroku tutorial covering this topic.
Cool as heroku.yml
There are two ways to deploy your app with Docker:
- container registry,
- heroku.yml config file.
The first one requires you to build your Docker images locally and push them to Heroku registry. Obviously, this requires a pretty solid internet connection as Docker images can swell up to hundreds of megabytes or more. Moreover, you have to remember to remove any artifacts from your local build context (files like .env, celerybeat.pid, etc.). All those issues are solved by the latter option, as heroku.yml allows you to offload the whole provision, build, and deploy process to remote servers. All you have to worry about is to have an internet connection. And as long as it can handle git push heroku master you’re good to go!
Step Five - herokurize the backend!
Navigate to the backend folder and create an empty heroku.yml file.
$ cd /path/to/heroku-polls-main/backend/ && touch heroku.yml
Then, paste the following config into newly created heroku.yml
setup:
 addons:
   - plan: heroku-postgresql
build:
 docker:
   web: ./Dockerfile
 config:
   REQUIREMENTS_FILENAME: heroku.yml
release:
 image: web
 command:
   - ./release.sh
run:
 web: uwsgi --http 0:$PORT --wsgi-file ./config/wsgi.py --master --processes 4 --threads 2
As you can see there are 4 top-level sections: setup, build, release and run.
In the setup phase, we can specify dependencies for our project. You can choose from a multitude of popular services, including PostgreSQL, Redis, Elasticsearch, Airbrake and many more. To explore available add-ons head to subpage dedicated to them. For our purposes, we are only going to use Heroku PostgreSQL as it comes with a free Hobby Dev plan (with a row limit of 10 000 entries). Although it’s possible to setup and customize a database manually, this is much more convenient as Heroku will not only expose a set of useful diagnosis commands but also inject DATABASE_URL environmental variable to our services at release and runtime. Pretty cool, huh?
Next stage is called build. Here we can specify processes we want to containerize and Dockerfiles for each one of them. Keep in mind that path to Dockerfile should be relative to heroku.yml location. Here web is the name of our process (image) running Django app. This is a special name, that will be handled uniquely by Heroku, as only processes with that name are eligible to receive external HTTP traffic. If for some reason you were to use e.g. nginx as HTTP server it should probably be declared as web process, however, in this example, we use an uWSGI router to handle incoming requests.
Another important thing to note is that runtime environmental variables are not available at the build phase. However, if any of the specified Dockerfiles requires additional configuration you can pass variables in build.config section. In this specific project, Dockerfile for Django app is pretty much identical to the production one, with the only difference in Python dependencies. Since we keep environment-specific requirements in separate .txt files we just substitute filename by passing the desired value through REQUIREMENTS_FILENAME variable and insert it into pip install command (backend/Dockerfile, line 13). Compare heroku.yml with docker-compose.yml, although the notation is slightly different, the concept looks pretty similar, right?
The release phase comes right after. Here we can specify a task to run before deployment of a new release. For Django app those tasks are typically:
- execute database migrations
- collect static files
Unfortunately, in spite of list notation release.command accepts only one command to execute. To circumvent that restriction we can execute a shell script containing all required actions. Check out release.sh file - it executes both aforementioned actions through Django’s manage.py commands.
Additionally, an image to perform tasks on can also be specified as release.image. If command declared in release section fails with non-zero code, the new release is not deployed. It usually means that there’s an error somewhere in your code, that has to be fixed.
The last phase, known as run is where you can specify a command to execute on container startup for each process. This is an equivalent of Dockerfile’s CMD or command in docker-compose.yml. Specifying run command for each process is not required, if skipped Heroku will try to fall back on to CMD command in Dockerfile used to build an image. In this tutorial, we launch an uWSGI http router in embedded mode with a master process that forwards requests to a pool of 4 uWSGI workers. Note that the port uWSGI listens on is not hardcoded, but rather specified as PORT environmental variable. Just like DATABASE_URL, Heroku will set that for us!
Wow, it’s been a long ride! Take a quick break, and make sure that you have a solid grasp of everything you’ve read so far ;) If you feel unsure about some concepts consult this concise official heroku.yml overview.
Open your terminal and navigate to backend folder (where heroku.yml resides). Execute:
$ heroku login -i
and enter your credentials to log in to Heroku.
At the moment of writing this article setup section of heroku.yml is not yet supported on the stable channel, so to create an app and tell Heroku to prepare a PostgreSQL add-on for it we have to switch to Heroku CLI beta and install heroku-manifest plugin. To do so execute:
$ heroku update beta
$ heroku plugins:install @heroku-cli/plugin-manifest
Now, we are truly ready to create our first Heroku app! To do so run:
$ heroku create <your-app-name> --manifest
Don’t forget to replace <your-app-name> with an actual, unique name! I chose to name it mrx-polls-backend, and this is the output from my terminal (yours should be pretty similar):
$ heroku create mrx-polls-backend --manifest
> Reading heroku.yml manifest... done
> Creating ⬢ mrx-polls-backend... done, stack is container
> Adding heroku-postgresql... done
> https://mrx-polls-backend.herokuapp.com/ |\
> https://git.heroku.com/mrx-polls-backend.git
A new remote was added under alias “heroku” (execute `git remote -v` to inspect). This is your private project git repository hosted by Heroku. Every time you push a commit to the master branch a release process is going to get triggered and any changes you’ve made are going to be deployed.
Head to your Heroku dashboard and you should see your app listed!

Click on it to inspect app details:

As you can see in the “Installed add-ons” our PostgreSQL database is ready to use! Head to “Settings” tab and click “Reveal Config Vars”. As you can see DATABASE_URL was automatically configured by Heroku!

Our Django app is going to need some more configuration to run properly. There are several things to make sure of when deploying to production: make sure DEBUG mode is off, set ALLOWED_HOSTS and strong SECRET_KEY. Also, we have to pass our S3 Bucket name and credentials. We can do it directly in the dashboard panel or through Heroku CLI. Here is how to do it in the latter fashion.
$ heroku config:set DEBUG=False ALLOWED_HOSTS=<allowed_hosts>
SECRET_KEY='<your_secret_key>' AWS_REGION=<aws_bucket_region> AWS_ACCESS_KEY_ID=<aws_access_key> AWS_SECRET_ACCESS_KEY=<aws_secret_access_key> AWS_S3_BUCKET_NAME_STATIC=<aws_bucket_name>
And here is how to figure out a value for each one of them:
ALLOWED_HOSTS - set it to “<your-heroku-app-name>.herokuapp.com,” (mind that comma at the end!). For my app that means:
ALLOWED_HOSTS=mrx-polls-backend.herokuapp.com,
SECRET_KEY - as you can see in the Django code repository Django generates a 50-characters long string. If you’re still running the sample project locally you can generate one by executing:
$ docker exec heroku-polls-main_django_1 python -c "from django.core.management.utils import get_random_secret_key; print(get_random_secret_key())"
Copy returned value and put it inside ‘’ (single quotes) so your entry looks more or less like this:
SECRET_KEY=’=j)plu@6o$folb5@w+gakwd%a2)=s8$x9ela2z5$%qjmuy9y’
AWS_REGION - set it to region your S3 Bucket was assigned to. The value may vary, in my case (for EU - Frankfurt) it is eu-central-1, so the entry looks like this:
AWS_REGION=eu-central-1
AWS_S3_BUCKET_NAME_STATIC - this one is really straightforward, just set it to your unique bucket name. In my case it would be:
AWS_S3_BUCKET_NAME_STATIC=mrx-polls-static
AWS_ACCESS_KEY_ID and AWS_SECRET_ACCESS_KEY - those values are in credentials.csv file you’ve downloaded from AWS. Contrary to secret access key, access key id is all uppercase ;)
There is one final step to perform, which is pushing your code to master branch of Heroku repository.
Add heroku.yml to tracked files and commit:
$ git add heroku.yml && git commit -m ‘Add heroku.yml config’
Checkout to new branch called heroku
$ git checkout -b heroku
Push your local branch heroku to remote branch master.
$ git push heroku heroku:master
..and wait ;) It’s time for Heroku to take over. You’re going to see commands in your Dockerfile executed as a new image is being built, then, if everything went well heroku should an output like this:
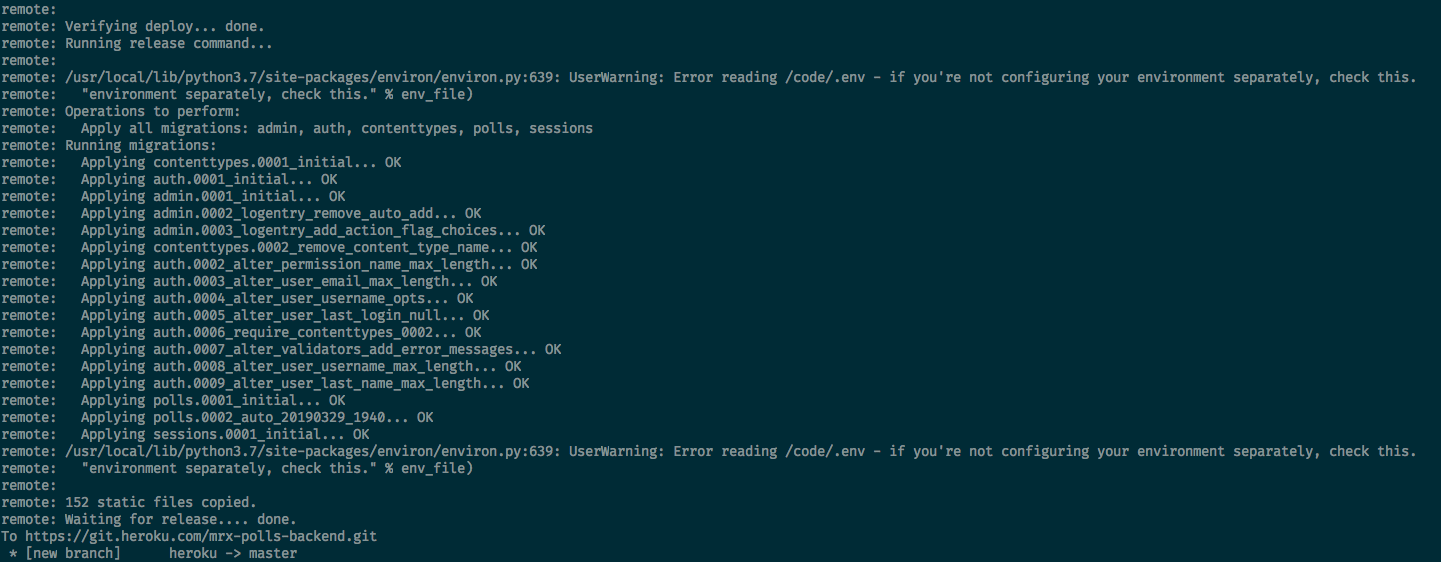
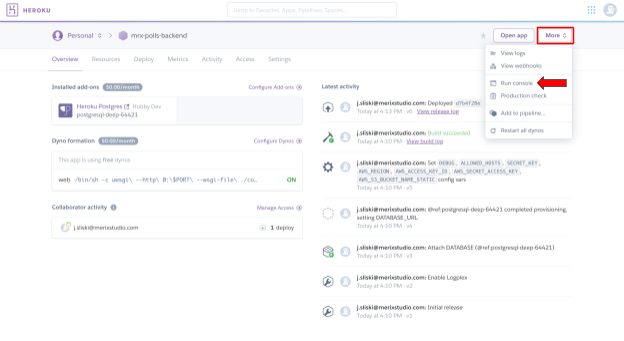
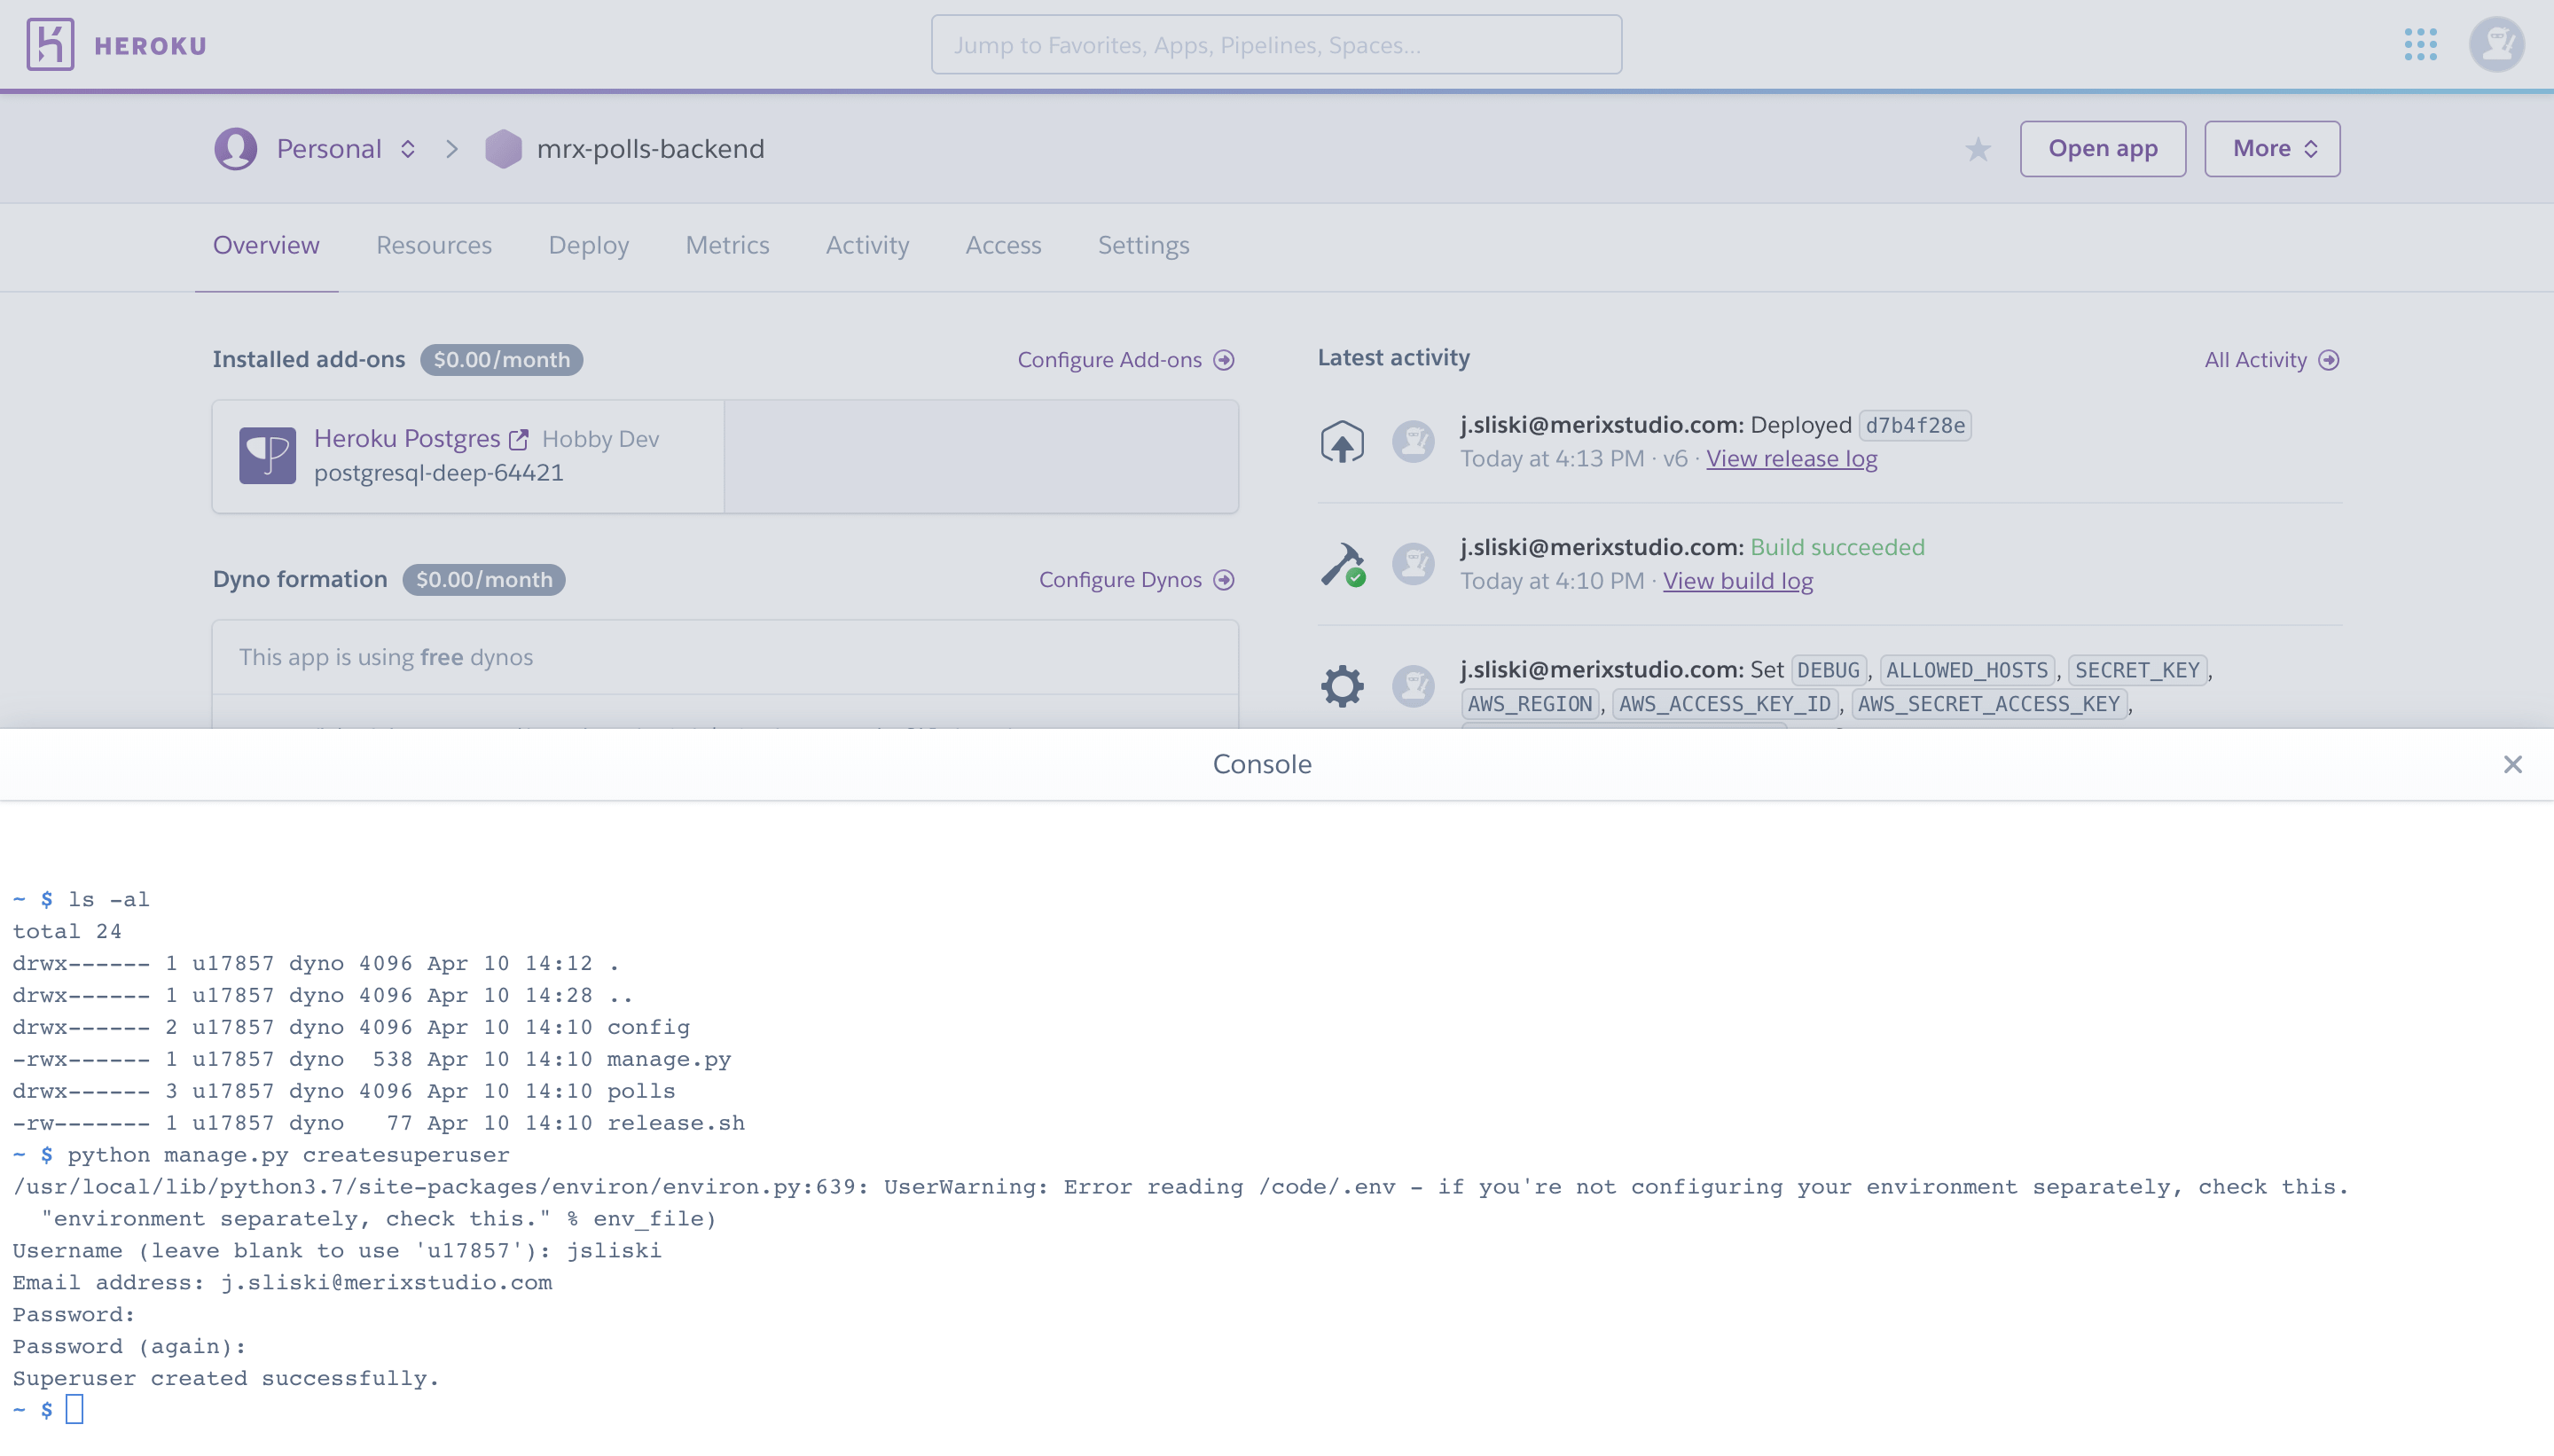
We are still missing an admin account to manage polls. Head to Heroku dashboard, enter backend app details and from top right corner select “More” -> “Run console”, type “bash” and click run. Wait for a couple of seconds and you should be in an interactive session in your Docker container!
Once you’re connected execute python manage.py createsuperuser and follow on-screen instructions to create a user with superuser admin privileges.
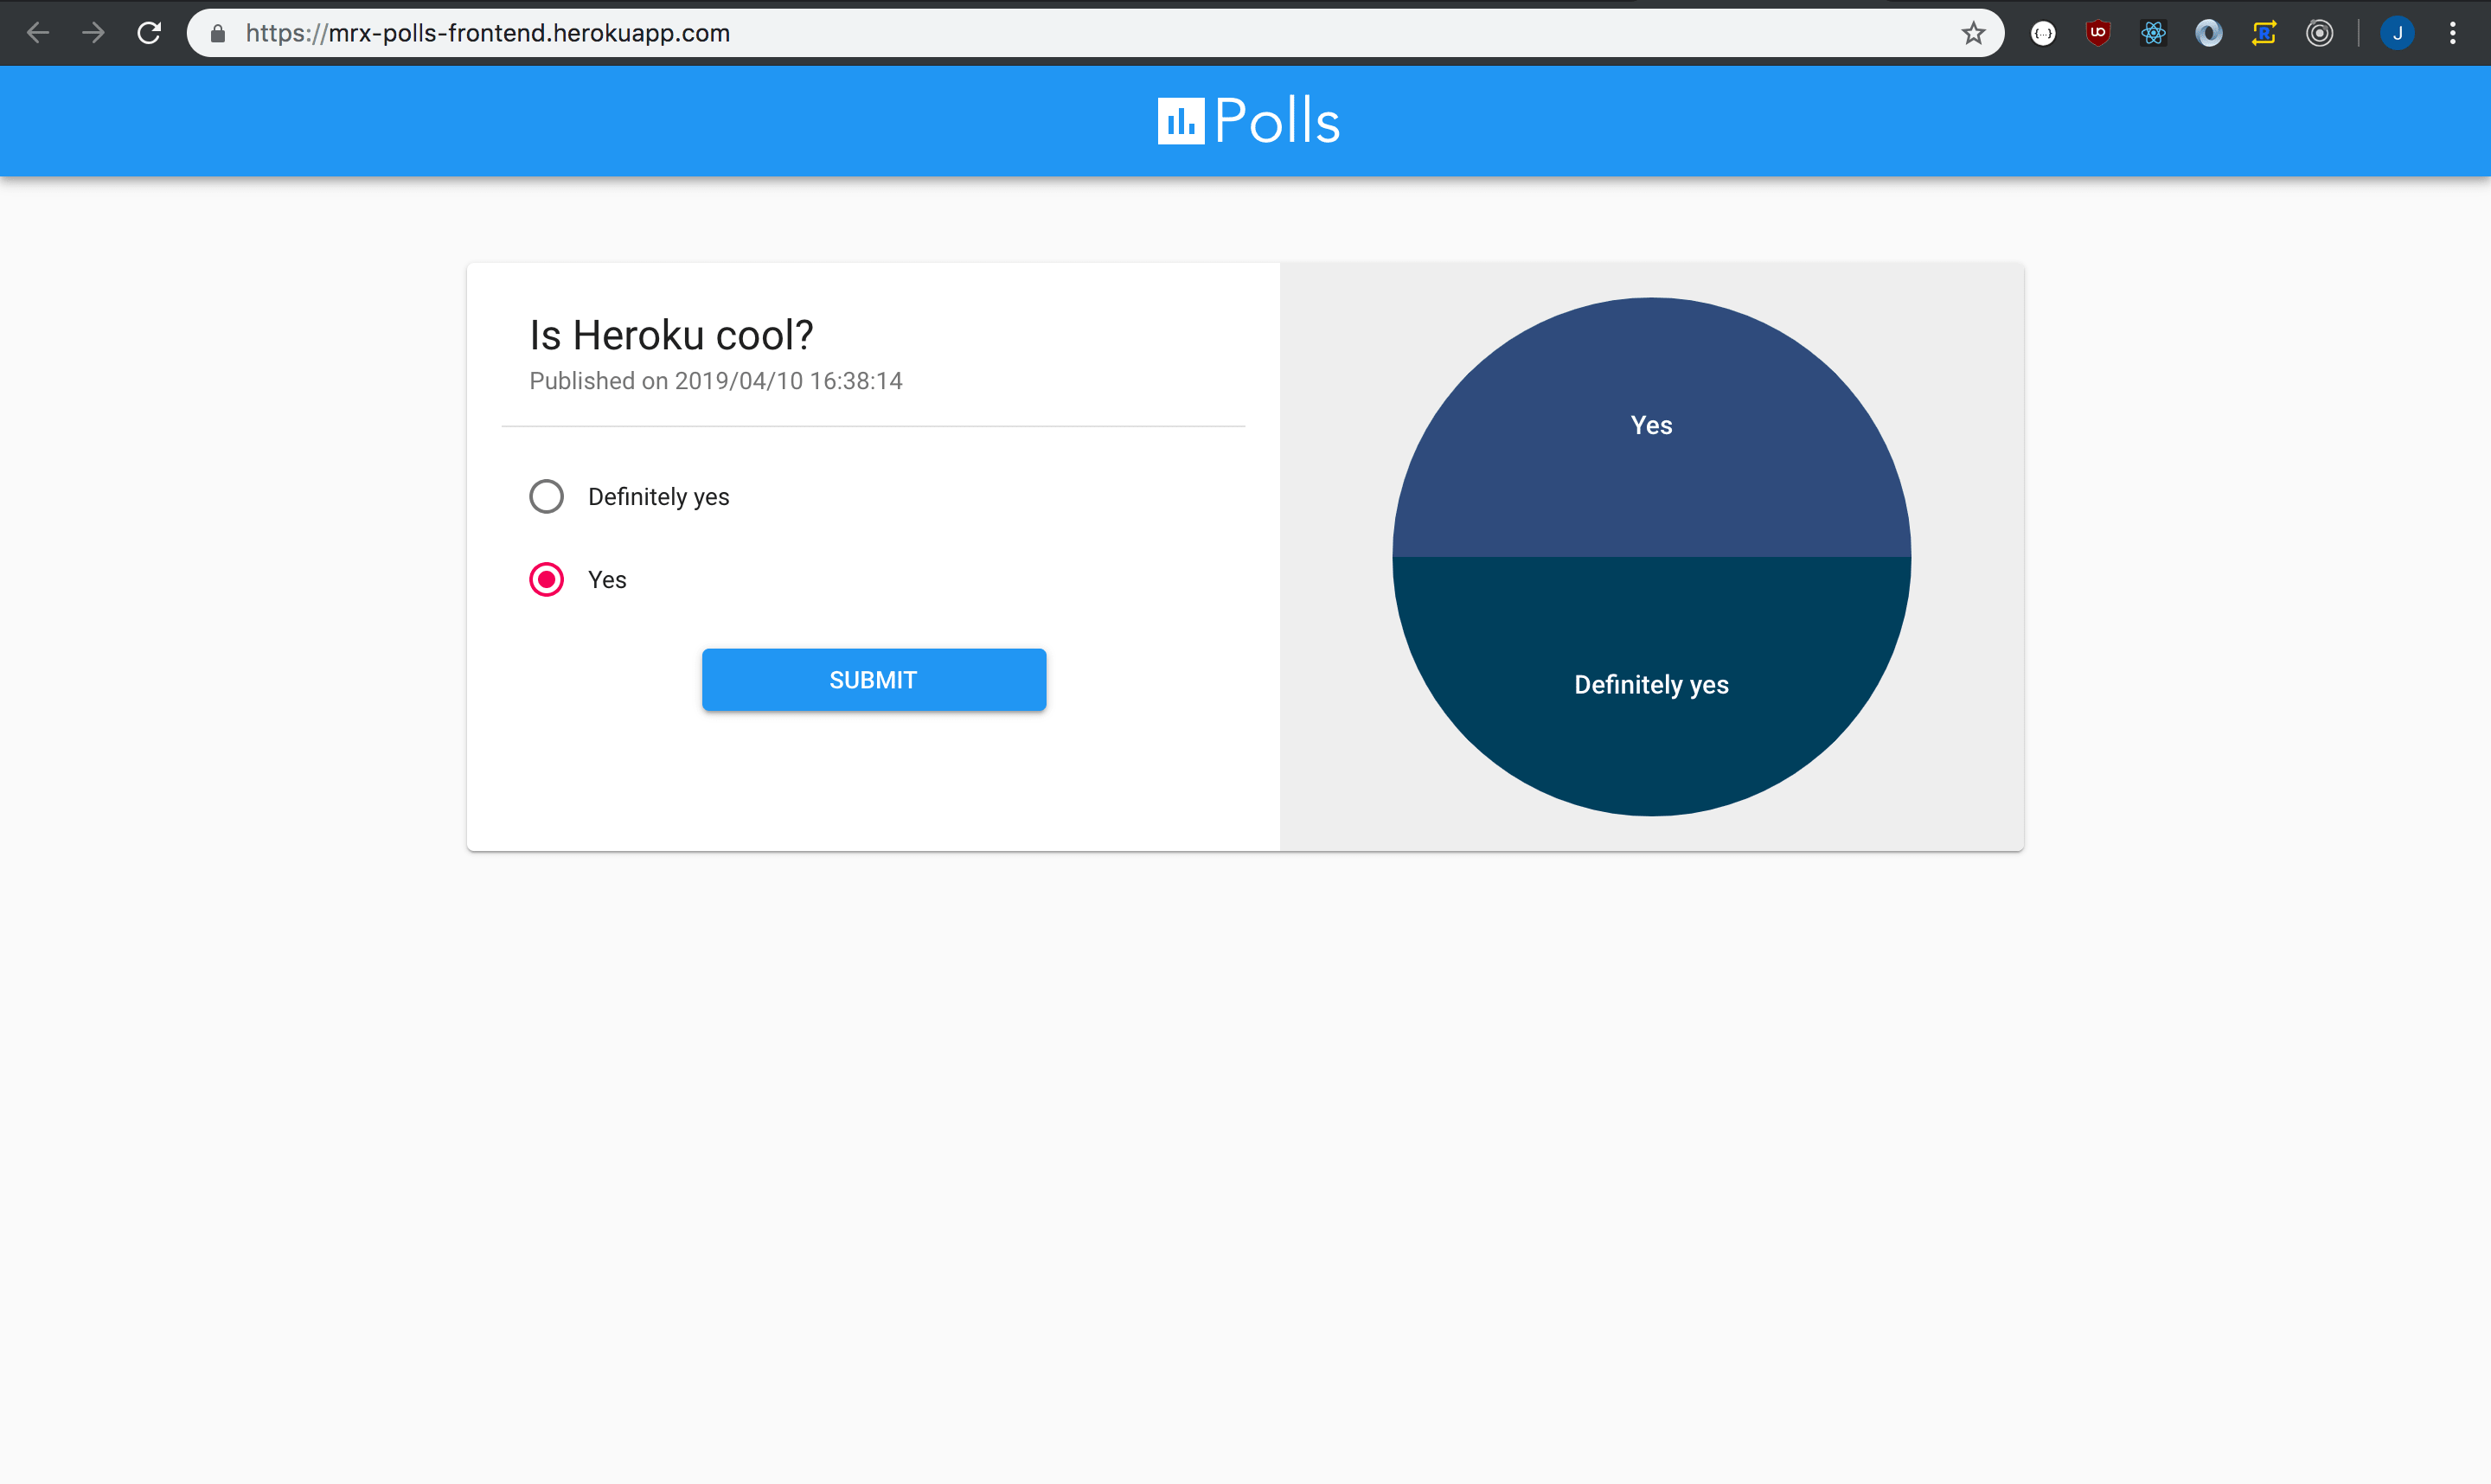
Close the console, hit “Open app” in the top right corner. You should receive a “Not found” message, but don’t worry. Just append “/admin/” to the URL and hit enter. You should get redirected to admin login panel. Input your credentials and verify if everything works by adding sample question and choices.
Congratulations, you’ve just managed to deploy a fully functional Django app to a production environment! Pat yourself on the back, and take another break as we’re nearing the end of this guide ;)
Step six - a final one, I promise!
There is one last thing to do - “herokurize” our frontend app. Fortunately, it requires even less configuration than backend!
In your terminal head to frontend folder and create another empty heroku.yml. This time we can skip setup and release phases as our frontend app does not depend on any other services (e.g. database). Instead, we can move on straight to build.
build:
 docker:
   web: ???
Unfortunately, this time we cannot use the same Dockerfile for local and production build. This is because we need to install additional dependency (called “serve”, to actually serve our app) and transpile our beautiful ES6 code to something understandable across most of the existing browsers.
To remedy this, create a file called Dockerfile.heroku right next to heroku.yml and paste the following code:
ARG VERSION=10.15.3-alpine
FROM node:${VERSION} as builder
ARG REACT_APP_BACKEND_URL
WORKDIR /code
COPY . /code/RUN yarn install --check-files
&& yarn build
FROM node:${VERSION} as final
WORKDIR /appCOPY --from=builder /code/build /app
RUN yarn global add serve
This Dockerfile utilizes a feature called multi-stage build, where we create an intermediary image (and name it “builder”). We copy all of our code to that image, then install dependencies (yarn install --check-files) and create a production-ready build (yarn build). The last command outputs optimized files to ./build directory. Then we create yet another image (with alias “final”) and copy content of /code/build directory from builder image to /app folder. In the last step, we install serve globally to serve our frontend app. More on multi-stage builds can be found in Docker official docs and, specifically for Python - in my article on leveraging Docker multi-stage builds in Python development.
But wait, how should our frontend app know where to make requests? It has all to do with that REACT_APP_BACKEND_URL variable declaration! If you take a look at src/utils.js you’ll notice it is used as base URL for all of the external requests. During local development, its value is taken from the .env.development file, and similarly, we can feed a production backend URL through .env.production file! I know it might sound a bit confusing, in that case, take a look into official React docs to learn more about environmental variables.
Create .env.production file right next to your .env.development file and populate it with the following entry:
REACT_APP_BACKEND_URL=https://mrx-polls-backend.herokuapp.com/api/v1/
Don’t forget to substitute “mrx-polls-backend” with a name you’ve assigned to your backend app on Heroku!
At this point we are ready to wire our Dockerfile to frontend heroku.yml. Open that file and make sure it looks like this:
build:
 docker:
   web: ./Dockerfile.heroku
As I’ve already mentioned a release phase can also be skipped as there is no task we have to execute before we spin up a frontend app. All we have to do is add run section with the following entry:
run:
  web: serve -l $PORT
Which basically means: serve the content of a current directory (/app) on the port provided through env variable PORT. And that’s a letter “L” (from “listen”) not “I” in case you’re wondering.
In your terminal navigate to frontend directory of heroku-polls-main project and execute:
$ heroku create mrx-polls-frontend --manifest
As always, make sure to choose a unique name for your app.
Add heroku.yml, Dockerfile.heroku and .env.production to tracked files and commit:
$ git add heroku.yml Dockerfile.heroku .env.production && git commit -m ‘Add heroku config’
Checkout to a new branch called Heroku...
$ git checkout -b heroku
… and push it to master branch on remote heroku:
$ git push heroku heroku:master
When build and deploy finishes type in:
$ heroku open
… and voilà!
Or not… :(
Free dynos are put to sleep if they won’t receive traffic for 30 minutes. Don’t worry, just try to access admin from another tab to wake it up and then refresh your frontend app!
Congratulations, you’ve made it to the end!
Be proud of yourself as now you not only know how to deploy with Heroku but also have the knowledge to make informed decisions in regard to many deployment aspects - a power that cannot be underestimated even by Obi Wan. Hopefully, you did not get lost along the way, but if so, I’m more than happy to assist you with any issues you’ve encountered. I do realize that there was a lot to process, but hey - in the end, the whole configuration has around 40 lines (including empty lines!). Do not believe me? Check out those pull requests with Heroku configuration for backend and frontend.


Navigate the changing IT landscape
Some highlighted content that we want to draw attention to to link to our other resources. It usually contains a link .
.svg)
.svg)
.svg)
.avif)

.avif)
.avif)
.avif)