.svg)

As a developer, I’ve spent most of my time working in a comfortable environment. Except for writing code, every part of the process of creating a product has already been taken care of. I didn’t need to configure CI/CD, think about the tech stack, bother with the deployment process, monitoring or whatever. Just write code, click “merge” once it’s been approved, and my job is done.
Some time ago, however, I’ve decided to create a complete solution from scratch. Today, I can finally invite you to join me in rediscovering the path I’ve taken while attempting to be a more conscious developer. I’m going to show you what I’ve achieved, what my decision-making process looked like, where I’ve struggled the most, and where I needed to retreat. And that happened often because as usual, I was relying heavily on the trial and error method.
The general idea and the matching tech stack
I wanted to build a very simple application containing minimum “business logic” to let me focus on all other aspects of development. Bearing that in mind, I’ve created an app consisting of two endpoints:
- listing visitors,
- adding visitors and incrementing their visits count.
This was simple enough not to spend too much time on coding itself and complex enough to face challenges that needed to be taken up. Like choosing a tech stack.
I’ve decided to go with the following technologies:
- Flask – I needed a simple framework and Django, which I was more familiar with, was simply too complex for the purpose of my project,
- Flake8 and Unittest – simple tools to do some testing stuff,
- SQLAlchemy – a mature ORM that integrates nicely with the framework of my choice,
- PostgreSQL – the project was so simple that for development purposes even SQLite would be enough. Nonetheless, I wanted to actually deploy it and to do so, I needed something I could manage. I went for PostgreSQL because I am familiar with this particular database and it has a good adoption among cloud providers.
- Docker – I needed a tool to manage dependencies and this one is so standard I can’t imagine working with anything else. I worked with Vagrant before and in this case, it would be overkill – after all, I don’t need to virtualize the entire machine.
- Docker-swarm – here I faced a hard choice between this orchestration tool and Kubernetes. However, taking into account the price and simplicity of the tool as well as the fact that I didn’t need anything really big, docker-swarm won.
- Gitlab for hosting code – what convinced me here was the built-in CI/CD mechanism which took some work off my back. I didn’t need to set up Jenkins or integrate any 3rd party tools.
- AWS – to be honest, I have mixed feelings when it comes to Amazon Web Services. On one hand, it offers a wide range of products and decent free tier limits; on the other, the learning curve seems to be quite steep.
- Nginx + Gunicorn – I used these two as a load balancer and gateway server respectively since they integrated smoothly.
- Ansible – I chose this one for automating the deployments out of curiosity. I wanted to see how it works and I’ve heard it was OK.
- New Relic – for monitoring as its free plan was enough and integration was simple.
That’s it when it comes to tech stack. As you can see, some of the decisions were well-thought-out while others were made pretty quickly – because I knew I wanted to stick with something I’m already familiar with or I wanted to get to know new tools. Also, I didn’t add any frontend since I wanted to focus on the DevOps/administrative part. Still, learning a JavaScript framework may become one of my goals for the future.
Getting down to coding
Let’s go to GitLab and take a look at what the code looked like at the beginning of the project (I’ll be pointing to important commits since my flow changed during the development cycle and some parts were very messy). Here’s what I had back then:
- Function for creating an application from settings,
- Function for registering urls,
- Command to create a database,
- Model of Visitor,
- 2 views handling incrementing the visits count and listing visitors,
- Unit tests.
Some decisions made at this point were all right, e.g. extracting the creation process to separate functions or managing the database in unit tests. Unfortunately, as far as I know, PostgreSQL does not support in-memory databases like SQLite or MySQL do but I liked my solution using context managers and emptying tables after each test.
Other decisions, however, turned out to be worse.
First of all, the model which stored the number of visits and the way those visits were counted:
class Visitor(db.Model):
 ID = db.Column(db.Integer, primary_key=True)
 username = db.Column(db.String(80), unique=True)
 visits = db.Column(db.Integer(), default=1)
And the way it was actually done:
def increment_visits(username: str) -> dict:
 visitor = Visitor.query.filter_by(username=username).first()
 if visitor is None:
 visitor = Visitor(username=username, visits=1)
 db.session.add(visitor)
 else:
 visitor.visits += 1
 db.session.commit()
 return {"id": visitor.ID, "username": visitor.username, "visits": visitor.visits}
You can immediately spot the race condition here, which actually happened. When doing benchmarks when I made, let’s say, 100 requests I ended up with the application state saying that there were about 70 visits. What’s more, both this and the other view had entire logic wrapped inside which ultimately made it impossible to subject them to unit testing. As a result, I needed to test entire views.
The next problem was improper handling of database connections. I did not close them and I had a big pool recycle time, which resulted in connection errors occurring after some time of idleness. In fact, I didn’t discover this issue until I actually deployed the project.
Another – fortunately, smaller – thing was the poor handling of the arguments passed to the script. This remains to be improved.
The last big issue was the lack of migrations. When I finally decided to address the first problem, I had a hard time going back and forth with the database state. Luckily, I could just drop the entire database although it wouldn’t be possible in the real-world scenario.
Introducing code improvements
Now that you know where I started from, it’s time to move on to the improved version of the code which can be found here.
The most important part of what’s been changed is located in models.py file. The race condition issues meant that I needed either to set a lock on the table or find another solution. My idea was to introduce some quasi-event sourcing architecture:
class Visitor(db.Model):
 ID = db.Column(db.Integer, primary_key=True)
 username = db.Column(db.String(80), unique=True)


class Visit(db.Model):
 ID = db.Column(db.Integer, primary_key=True)
 visitor = db.Column(db.Integer, db.ForeignKey('visitor.ID'), index=True)
Now, visits are counted as separate events. Each hit at the endpoint for incrementing them adds a new event (Visit). Visit has an index on the relation column to provide faster queries. I am only talking about quasi-event sourcing because what you see here is an extremely simplistic case. No additional databases or complicated data aggregating are involved.
Going for such architecture meant that I needed to change the way I was providing data to the user and saving it. Since I already had quasi-event sourcing, I needed to properly separate queries and commands (CQRS), ideally kicking them out of the views.
def index():
 results = get_all_visits()
 return {"results": results}


def increment_visits(username: str) -> dict:
 if username == "favicon.ico":
 return {}
 visitor = get_visitor_by_username(username)
 increment_visits_for_visitor(visitor)
 return {
 "id": visitor.ID,
 "username": visitor.username,
 "visits": get_visits_for_visitor(visitor)
 }
This looks much cleaner and the logic is just where it should be. For example, delivering the count of visits per user for all users is now:
def get_all_visits() -> list:
 visitors = db.session.query(
 Visitor.ID,
 Visitor.username,
 func.count(Visit.ID).label('visits')
 ).outerjoin(
 Visit
 ).group_by(
 Visitor.ID
 )
 db.session.close()
 response = [
 {
 'id': visitor.ID,
 'username': visitor.username,
 'visits': visitor.visits
 }
 for visitor in visitors
 ]
 return response
The benefit is that the view does not know what database is used underneath. It just asks for some data and receives a simple structure for it.
On the command side, this is how adding the Visit event is handled:
def increment_visits_for_visitor(visitor: Visitor):
 db.session.add(Visit(visitor=visitor.ID))
 db.session.commit()
I also solved the problem of expiring sessions I’ve talked about earlier by adjusting the database settings:
DB_POOL_SIZE = int(os.environ.get('DB_POOL_SIZE', '10'))
DB_POOL_RECYCLE = int(os.environ.get('DB_POOL_RECYCLE', '60'))
SQLALCHEMY_DATABASE_URI = f'postgresql://{DB_USERNAME}:{DB_PASSWORD}@{DB_HOST}/{DB_NAME}'
SQLALCHEMY_ENGINE_OPTIONS = {
 'pool_size': DB_POOL_SIZE,
 'pool_recycle': DB_POOL_RECYCLE,
}
Unfortunately, the expiring session error is the one I don’t fully understand. I must admit that my code works and I don’t know exactly why. Well, I guess I’ll have to put it somewhere on my to-learn list.
Of course, the above-mentioned changes required me to think of a way to provide an interface to create migrations and apply them:
if __name__ == '__main__':
 if 'createdb' in sys.argv:
 app.app_context().push()
 db.create_all()
 elif 'init' in sys.argv:
 app.app_context().push()
 init()
 elif 'migrate' in sys.argv:
 try:
 message = sys.argv[2]
 app.app_context().push()
 migrate(message=message)
 except IndexError:
 print('Usage: python main.py migrate <message>', flush=True)
 elif 'upgrade' in sys.argv:
 app.app_context().push()
 upgrade()
 elif 'downgrade' in sys.argv:
 app.app_context().push()
 downgrade()
 else:
 app.run(host=HOST, port=PORT, debug=DEBUG)
As I’ve said, this part of the application responsible for handling command-line arguments is still in need of improvements but it’s not that important for now.
That’s it for part 1. Next on the agenda: Docker, Swarm, testing, and monitoring performance. So if you’re curious how the project turned out, stay tuned for Part 2!
Care to hone your coding skills? Join our team and let’s do it together!
And if you, by any chance, missed Part 1, in which I introduce the idea behind the project, the tech stack I decided on, and show you the evolution of the code – go read it immediately! For now, however, let’s go back to our app.
Project dockerization
Dockerfile has a simple structure and the only optimization made during the development was choosing “slim” version of Debian’s image.
FROM python:3.8-slim-buster

WORKDIR /app

COPY requirements.txt /app/requirements.txt
COPY dev-requirements.txt /app/dev-requirements.txt
COPY setup.cfg /app/setup.cfg

RUN pip install -r dev-requirements.txt

COPY src/ /app/src/

CMD ["python", "src/main.py"]
I have two separate docker-compose files: one for development and one for production. The development one consists of two services, web and database. In the production version, there is no database added since it’s handled by AWS’ RDS and it has Nginx running as a reverse proxy.
Moving the database to another server allowed me to save up some precious gigabytes of disk space at the cost of slightly higher (no more than 10-20ms) response times. This config means that I have de facto twice that much RAM and CPUs available and I do not have to worry about regular backups.

The only thing that I found troublesome was opening the database to a public network to be able to access it with PgAdmin or PyCharm’s database manager. Not only did I need to set up proper security groups, but also explicitly mark the option to expose database.

What’s more, there are Newrelic tools used. In order to achieve this, I needed to modify the command by adding “newrelic-admin” in front of the command spawning gunicorn and passing config file setting as the environment variable.
version: "3.7"

services:
 web:
 image: "gonczor/aws-simple-app:prod"
 env_file:
 - .web.env
 command: newrelic-admin run-program gunicorn wsgi:app -c ../configs/web/gunicorn_conf.py
 working_dir: /app/src
 volumes:
 - ./configs/web/:/app/configs/web/
 environment:
 - NEW_RELIC_CONFIG_FILE=/app/configs/web/newrelic.ini
 deploy:
 placement:
 constraints:
 - node.labels.type == app
 nginx:
 image: "gonczor/aws-simple-app-nginx:prod"
 ports:
 - "80:80"
 depends_on:
 - web
 volumes:
 - ./configs/nginx/:/etc/nginx/conf.d/
 deploy:
 placement:
 constraints:
 - node.labels.type == app
Deploy constraints are a bit of an overkill since I only have one instance of docker machine running.
Testing
With Gitlab as my code repository provider, I wanted to make use of its CI/CD tools. The process I designed consisted of 2 stages:
- Test – whereby unit tests and linting were launched in 2 separate pipelines,
- Build – action conducted only on the master branch after the merge request was merged (merge request is equivalent to Github’s pull request). That’s where the building of the docker image and pushing it to the docker hub would take place.
I’ll only share the final configuration:
.before_scripts: &before_script
 before_script:
 - cp .web.env.example .web.env
 - cp .db.env.example .db.env
 - apk add python-dev py-pip libffi-dev openssl-dev gcc libc-dev make
 - apk update
 - pip install docker-compose
 - docker-compose build

stages:
 - test
 - build

default:
 image: docker
 services:
 - docker:dind


tests:
 stage: test
 services:
 - docker:dind
 - name: "postgres:11-alpine"
 alias: db
 script:
 - docker-compose up -d db
 - docker-compose up -d web
 - docker-compose exec -T web python src/tests.py
 <<: *before_script

lint:
 stage: test
 script:
 - docker-compose up -d web
 - docker-compose exec -T web flake8
 <<: *before_script

build:
 stage: build
 script:
 - docker login -u gonczor -p $DOCKER_HUB_ACCESS_TOKEN
 - docker build -t gonczor/aws-simple-app:prod -f Docker/Dockerfile .
 - docker push gonczor/aws-simple-app
 only:
 - master
Separating linting and unit tests has let me run stuff in a parallel manner. In larger projects, this would be a major advantage as it would result in streamlining the development process.
Once tests are passed and changes are merged, build is triggered for the master branch, image is pushed to my docker hub. I wanted to use a separate development branch but since I do not have any testing environment (I simply decided this is not necessary) I merge features directly into master. Token is stored as a variable in GitLab’s CI configuration so that it’s not revealed and I have easy access to it from CI setup. Once the image is pushed, I can pull it on the server and run the updated code version.
If I make a mistake and want to return to the last known good version, I only have to revert the merge request and deploy again, maybe reloading the database if changes are incompatible.
Joining the swarm
I created a single node deployment. Docker swarm allows adding servers on-demand using AWS and other cloud solutions, which means that I could launch my t2.micro instance from the local command line. Nonetheless, since I already had one server up and running I used a generic driver:
docker-machine create --driver generic --generic-ip-address=1.2.3.4 --generic-ssh-key ~/.ssh/id_rsa --generic-ssh-user=ubuntu srv1
Then, after logging in the machine via ssh, I needed to join nodes and deploy:
docker swarm init --advertise-addr 1.2.3.4
docker-swarm join-token manager
docker swarm join --token SOME_TOKEN 1.2.3.4:2377
docker stack deploy -c docker-compose.prod.yml demo
docker exec ec4cb96be20d python main.py createdb
With services up and running I could scale and monitor them.
docker service scale demo_web=2
demo_web scaled to 2
overall progress: 2 out of 2 tasks
1/2: running [==================================================>]
2/2: running [==================================================>]
verify: Service converged
docker node ls
ID HOSTNAME STATUS AVAILABILITY MANAGER STATUS ENGINE VERSION
9b6eoou4yoy0pcof2avamr7cl * srv1 Ready Active Leader 19.03.6
docker stack services demo
ID NAME MODE REPLICAS IMAGE PORTS
hs5z2f38zns3 demo_nginx replicated 1/1 gonczor/aws-simple-app-nginx:prod *:80->80/tcp
s1ezd24c2i5u demo_web replicated 2/2 gonczor/aws-simple-app:prod
Monitoring with Newrelic
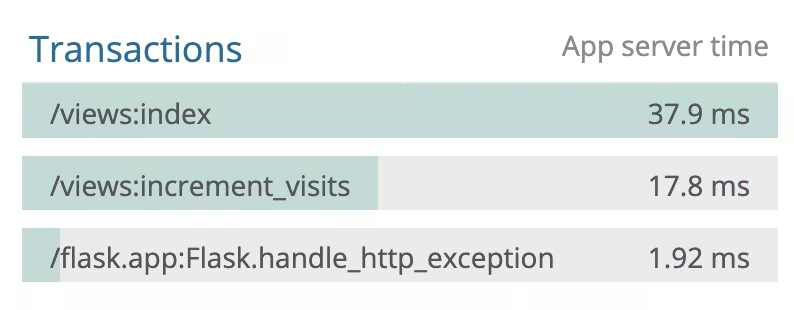
As soon as I had everything up and running, I decided to run some load tests. That may not be the most exciting part for an application that has only 2 endpoints and performs 3 database queries (at the most) but I was curious how much traffic such a simple configuration can take. Remember: we are talking about Nginx and Gunicorn on the same free-tier server. It turned out that having scaled “web” service to 2 instances, I was able to handle 1 500 requests per minute.

Newrelic also lets me monitor the slowest endpoints so that I know where to put my attention when trying to optimize the entire application.
Automating deployment with Ansible
The deployment process is extremely simple. All you do is
- pull changes from git,
- run “docker stack deploy -c docker-compose.prod.yml demo” command.
An additional step could be upgrading (or downgrading in case of reverting changes) the database schema, but this is currently not implemented.
Anyway, I wanted this automated. Ansible needed hosts file to know where it should run the commands:
demo.blacksheephacks.pl ansible_user=ubuntu
It also called for a “playbook”, which is a set of commands to be run on target hosts written in the form of yaml config:
- name: "Deploy docker stack"
 hosts: all
 tasks:
 - name: "pull"
 command:
 chdir: aws-simple-app/
 cmd: git pull
 - name: "deploy"
 command:
 chdir: aws-simple-app/
 cmd: docker stack deploy -c docker-compose.prod.yml demo
This, however, was still problematic since I wasn’t forwarding ssh keys needed to perform the “git pull”. To fix this, I needed to add the following lines in ~/.ansible.cfg:
[ssh_connection]
ssh_args=-o ForwardAgent=yes
This way I was able to successfully run my deploys with:
ansible-playbook -i ansible/hosts ansible/deploy.yml
Further improvements
In every project, there’s a possibility to do something better. Yet, I’m a fair believer in the claim that done is better than perfect so instead of introducing more and more minor changes ad mortem defaecatam, I decided to finally share with you what I’ve learned working on the project. However, if I were to continue my quest, I’d focus on the following enhancements:
- Creating a frontend
I was never that much interested in frontend work but I believe that putting some effort into it would not only cause the whole project to look nicer but also allow me to learn about stuff like serving static files (most probably, I’d go with S3 storage). Introducing some security mechanisms like CSP would also be a benefit.
- Using Kubernetes
I’ve seen what docker-swarm can do. I like it and I believe it’s enough for certain projects but I’m still curious what else can be achieved with Kubernetes. I also believe I could combine learning this tool and getting to know some other cloud solutions like GCP, which has free Kubernetes management tools (AWS has only paid options).
- Deploying on multiple nodes so that I could learn how to orchestrate more complex applications
- Improving the deployment process
I don’t need the entire codebase pulled, just docker-compose file and proper environment variables set. This would improve security since code wouldn’t be kept on the server but in docker images. Moreover, as I’ve already mentioned, it would be nice to have database upgrades and downgrades included.
Having said that, I need to stress out that working on this project, that I’ve learned a lot from an engineering perspective. One of the lessons was choosing proper tools before starting development. In this case, I was able to add more to the tech stack as I went on with the project and withdraw from certain decisions like the choice of database setup, which initially ran on the same server as the application inside a separate container and was moved to RDS later or changing docker-compose to docker swarm to run the project.
That’s it. I hope that you enjoyed the article and, ideally, found an inspiration to do something on your own.
Inspired to step up your coding game? Join us and work on ambitious projects daily!

.svg)
.svg)
.svg)
.avif)

.avif)
.avif)
.avif)