.svg)
.webp)
The History
The MutationObserver API was first introduced in 2012 in Chrome 18 and it was a very long-anticipated improvement to MutationEvent. The previously used solution was not implemented consistently across different browsers and moreover, could cause some serious performance issues! Even in the MDN documentation, we can find a fragment about adding the DOM mutation listeners to a document that can ‘profoundly degrade the performance’ making them even 7 times slower! This resulted in the rising popularity of the new solution and it is introduced to the W3C DOM4 recommendation in November 2015. Since then the MutationEvent has become depreciated and we can say that the ‘new era’ has begun.
The Hero
MutationObserver API is free of its predecessors’ problems with consistent implementation, as a matter of fact, it is supported by most modern web browsers, let’s just see the Can I use the chart:

As you can see, there is no need to use some kind of fallback to support IE11 or any other older browser. You can use it freely in your JavaScript code without any worries.
Right now you might be asking a simple question - ‘OK, but what about the performance?’ - and the answer is that the API does not cause any significant performance drops when being used. However, you have to remember that the DOM manipulations have to be approached with some dose of wariness, especially when you are listening to some of these changes and executing additional code using MutationObserver API. So always be sure that you avoid running unnecessary code and that you stick to best practices when manipulating DOM. If we have the introduction out of the way, let's jump into the more detailed view of the API.
The syntax
The basic syntax is really simple and easy to follow. First, we will define the node that we want to keep track of.
const mutationTarget = document.querySelector(‘.aboutToChange’);
Then we can create an instance of our observer using the MutationObserver() constructor and pass into it our callback function that will be invoked whenever any changes to DOM, that passes our initial config, will be detected.
const observer = new MutationObserver(callback);
For now, let’s keep our callback function simple, we will determine what kind of magic can we do inside it later on.
const callback = mutations => {
    // nothing to see here yet :)
};
To begin the observation we use the observe() method of MutationObserver. As the first argument, we pass the node we want to start to observe and as a second one the observer configuration.
observer.observe(mutationTarget, config);
This syntax might look awfully similar to another observer that we already described on our blog - the IntersectionObserver, but don’t be misjudged they look similar only on the surface.
The possible configuration
The second argument we passed to our observer function in the last line of code in the previous section included the configuration that is the most important part of any MutationObserver as it determines at what kind of changes to the DOM tree are we listening for. I must say that the provided options can satisfy even the most demanding developers. At first, I will only provide you with a configuration options object with all possible value pairs available. But do not worry, you will be able to find a detailed explanation for each one just below.
const options = {
    attributes: true,
    childList: true,
    characterData: true,
    subtree: false,
    attributeFilter: [‘id’, ‘class’, ‘style’],
    attributeOldValue: false,
    characterDataOldValue: false
}
As you can clearly see, only one of the properties is not a Boolean. Of course, you do not have to include every single value pair each time you are setting up your MutationObserver. To work properly and not to throw an error in the console, only one of these three properties must be set to true: attributes, childList or characterData:
- attributes - when set to true, let us track changes to attributes on the given node.
- attributeFilter - If you want to narrow down the list of attributes or listen only to a specific attribute change, attributeFilter can come in handy. Simply specify an array with the given attribute name or multiple names as a string and you are ready to go! Please take note that if the attributes property is set to ‘false’, the attributeFilter option will be ignored.
- childNodes - the observer will look for changes to specified node child elements that are being added or removed.
- characterData - we can track changes to a specific text node.
- subtree - in some cases we not only want to observe the target node or it’s immediate children but also all the elements inside of it. There are a couple of connected value pairs that can help in some cases. Setting both ‘attributes’ and ‘subtree’ to true will result in MutationObserver listening to the changes not only in the target node but also as the name implies it’s sub-tree. Similarly, with ‘characterData’ we will get hold of changes to any texts, and with ‘childNodes’ we will get the information about the element's child nodes even if they are not immediate children.
- attributeOldValue - set to ‘true’, lets us keep track of the old value of the changed attribute.
- characterDataOldValue - similar to above lets us keep the old, changed text values.
I hope that everything that I mentioned so far is clear and easy to understand. Now let’s take a look at what happens after specific changes, that we configured in our options object were observed and the callback is executed.
MutationRecord
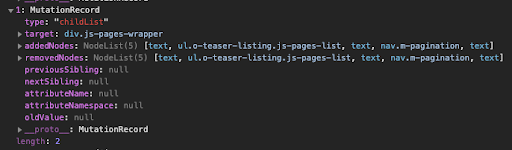
The callback function takes two arguments provided by the MutationObserver API - first - let’s describe it as mutations list, and second - the observer itself (we will not be focusing on this one, for now, this is strictly for reference purposes). Inside this list, we can find individual MutationRecord objects describing each change that was observed on the provided node. To better understand how does it look and what information we can get from it, let’s take a look into real-life examples. I’m not going to include all the code for this example as it will take too much time to get through every single line. Just imagine a situation - we are fetching data for a pagination list component. While fetching we add a class ‘is-loading’ to that component after we are done replacing the items inside the list we are removing the ‘is-loading’ class. For now, let’s set the observer to observe for both childList and attributes modifications. This is our config object:
const config = {
    attributes: true,
    childList: true
};
Now for our callback let’s just ‘console.log()’ our mutations list:
const callback = mutations => console.log(mutations);

As you can see we are getting two separate MutationRecords. First one is recorded after the attribute change, the second after the childList update. If we take a look inside of the record we can see a more detailed view and get some additional information on what has changed. For example the mutation type, target, etc. Description of every value listed here can be found here in DOM Spec.
I think that it is a good time to demand more precision from our MutationObserver callback and react to very specific changes. Let’s say that we want to do something only if the node we are watching no longer has class ‘is-loading’ in it. We can adjust our initial config object to store the old value the attribute and react only to class change:
const config = {
    attributes: true,
    attributeFilter: [‘class’],
    attributeOldValue: true
};
In our callback function, we remove the initial ‘console.log()’. First, we want to filter our mutation records and leave only the ones that pass our condition. After that, we can use forEach on the rest of the records and execute the code we want. The code can look like this:
const callback = mutations => {
    mutations
.filter(mutation => mutation.oldValue === ‘js-pages-wrapper is-loading’)
.forEach(mutation => console.log(mutation));
};
Using this mutationObserver we can be one hundred percent sure that we execute our code only when the class ‘is-loading’ is being removed from the selected node.
Additional methods
After we detect the change to the DOM element we might not want to continue to observe the current node. There is an additional key feature that we can use on our observer - disconnect:
observer.disconnect();
Yes, this is that simple, we just stopped observing the node!
In case we used the disconnect method there could be a possibility that not all changes have been processed by the observer yet. There is an additional method called takeRecords that saves the list of unprocessed mutationRecords.
‘ let unprocessedRecords = observer.takeRecords();’
The influence of MutationObserver API introduction
The introduction of MutationObserver API makes listening and reacting to DOM manipulations relatively easy. With just a few lines of code, we can accurately detect those changes without causing any performance issues. I hope this article will help to solve some interesting problems in your app or solve a long-time issue with performance. Happy coding!


Navigate the changing IT landscape
Some highlighted content that we want to draw attention to to link to our other resources. It usually contains a link .
.svg)
.svg)
.svg)
.avif)

.avif)
.avif)
.avif)