.svg)
.webp)
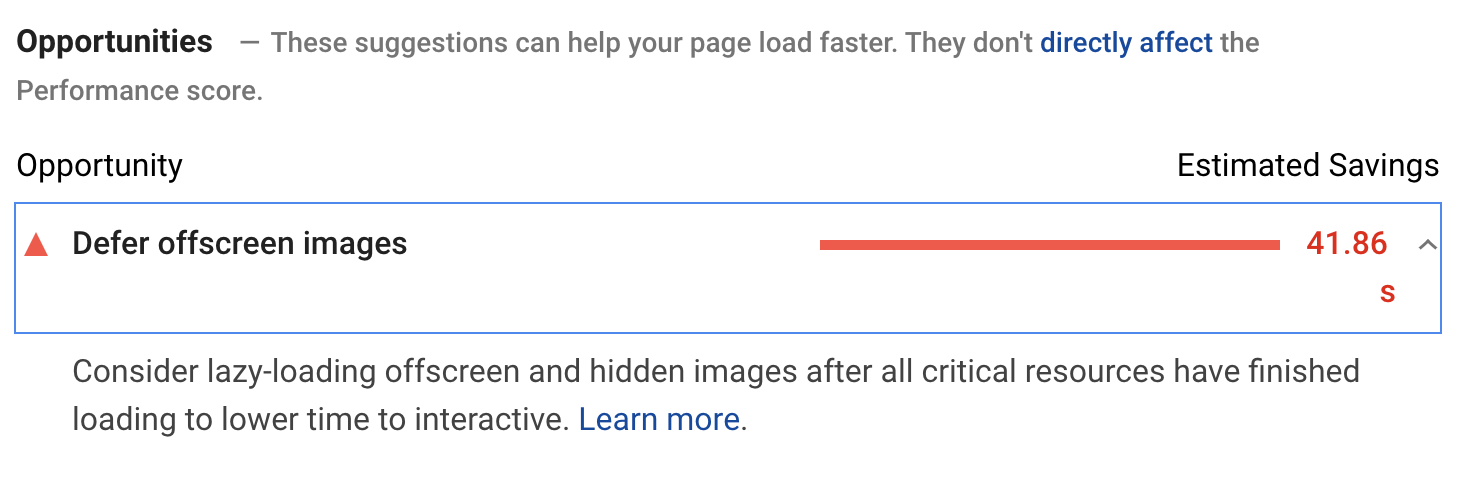
By definition, lazy loading is a way to postpone the loading of non-critical assets such as images, videos or simply some data at page load time. For example, the user doesn’t always scroll directly to the section of the page where the actual image or video resides so there is no need to load it during the initial render. In audits this situation is often referred to as offscreen resources:
Browsing the web, you’ve probably already come across at least one – if not more – implementations of lazy loading. Chances are, it was one of the following examples:
- Scrolling to the bottom of the page with more and more articles being loaded.
- The section coming into viewport showing only a blurred placeholder and changing it to a proper image after being fully displayed.
- Video starting to play only once you scroll the page to reach it.
By now, you should already have a general idea of how lazy loading works. Now, let’s move to the fun part – the implementation in code.
Why should I consider lazy loading?
Lazy loading is not only a fun feature – it can actually benefit your digital product. It all boils down to lazy loading reducing the time the webpage takes to initially load and become interactive by limiting the number of requests and the amount of data being loaded! A few extra seconds saved on loading assets can have a huge impact on conversion rates and the ability to engage visitors.
Let me quote some data to prove my point: studies say that even a one-second delay can yield an 11% fewer page views and a 16% decrease in customer satisfaction. This is particularly important for mobile users who nowadays represent more than 50% of the market share.
Another argument for lazy loading is that not displaying excessive images or data means saving money, especially for users with limited data plans. This also leads to reduced usage of other device resources such as processing times, battery consumption and more.
Now you are probably asking yourself, how can I implement lazy loading in my application? Let me give you some ideas and explain how I approached that task when working on Merixstudio’s website.
Putting theory into practice
I assume that reading this article, you are already familiar with JavaScript and it’s concepts. If not, however, I’d recommend reading about the basics first.
But let’s go back to today’s topic: lazy loading in pure JavaScript. The simplest solution is to reach out and use an already existing library, such as:
- lazyload - lightweight library with legacy browser support including IE9. It can be used with frameworks (React, Angular or Vue.js) as well.
- lazysizes - SEO friendly, high-performance library with a handful of additional plugins to extend its functionality.
- yall.js - lightweight (only 1.64 kB) library compatible with IE11 and all other modern browsers.
If you don’t want to use third-party libraries for lazy loading, do not worry – there are two options left for us to discuss.
Event Handlers
Using event handlers is considered to be one of the most compatible ways to approach lazy loading that works pretty much on every browser. To illustrate my point, I will use a code snippet from Google Developers. Let me walk you through this example.
Once the DOM loads, we create an array from all images with class lazy. Instead of default src property, the images have data-src attached to them. Thus, they aren’t displayed with initial page load.
Then, after the user scrolls the page down to the area where the individual images should be displayed, the empty src property is populated from data-src and the image is loaded to the page. The .lazy class is also removed from given image which is subtracted from our lazyImages array. This continues until all the images are loaded and our array is empty – then, the event listeners are removed from the page.
document.addEventListener("DOMContentLoaded", function() {
  let lazyImages = [].slice.call(document.querySelectorAll("img.lazy"));
  let active = false;

  const lazyLoad = function() {
    if (active === false) {
      active = true;

      setTimeout(function() {
        lazyImages.forEach(function(lazyImage) {
          if ((lazyImage.getBoundingClientRect().top <= window.innerHeight && lazyImage.getBoundingClientRect().bottom >= 0) && getComputedStyle(lazyImage).display !== "none") {
            lazyImage.src = lazyImage.dataset.src;
            lazyImage.srcset = lazyImage.dataset.srcset;
            lazyImage.classList.remove("lazy");

            lazyImages = lazyImages.filter(function(image) {
              return image !== lazyImage;
            });

            if (lazyImages.length === 0) {
              document.removeEventListener("scroll", lazyLoad);
              window.removeEventListener("resize", lazyLoad);
              window.removeEventListener("orientationchange", lazyLoad);
            }
          }
        });

        active = false;
      }, 200);
    }
  };

  document.addEventListener("scroll", lazyLoad);
  window.addEventListener("resize", lazyLoad);
  window.addEventListener("orientationchange", lazyLoad);
});
The above example could cause some performance issues, though. Generally, it’s not the best idea to attach handlers to the window scroll events because the event’s fired too often. In spite of adding throttling to limit and delay the function calls, it is invoked every 200 milliseconds whether a lazy loaded asset is currently in the viewport or not. This brings us to – in my opinion – the best solution currently available: IntersectionObserver.
IntersectionObserver API
IntersectionObserver API is a powerful tool that in simple words allows us to observe elements that “intersect” with the viewport and – when they do – fire a callback function. It’s already supported by many modern browsers but if you still need fallback for legacy browser, this polyfill can come in handy.
To create an observer we simply have to call its constructor and pass in the callback function we want to run whenever the threshold is crossed and as a second argument options object to specify the behaviour.
The name of observer is up to you:
`const assetsObserver = new IntersectionObserver(callback, options);`


The options can also be called whatever you like - let’s leave them as ‘options’ for now.

` const options = {
root: ‘’,
rootMargin: ‘’,
threshold: ‘’
};’
What exactly are these options used for? To get some more info on that matter, please see the MDN documentation. Right now, I’ll only share some of my insights and as we continue with the code everything should become even more understandable:
- Root: in most cases, you won’t need to set this property. If not specified or set to null, it refers to viewport to check the visibility of a given element.
- rootMargin: can be referenced to css margin property, for example ‘0px 0px 200px 0px’. One small difference you need to bear in mind is that you have to specify units (both % and px) on zero values. The given set of values means that we are growing the top side of root element by 200px. By default these values are set to 0.
- Threshold: takes an array or a single number. The default is 0 which means the callback is fired as soon as even 1px of the target is visible. Setting threshold to 1 means that the callback will be executed only when 100% of target element will be in the viewport.
Choosing the right assets
To proceed with the code, we have to decide which assets in our web-page should be lazy loaded in the first place. The ideal candidates are images used as background in css and the ones embedded in html. Videos are another great choice if we want to limit the amount of data at initial render.
For this article, my example was Merixstudio’s About Us page. Scrolling down, you can meet the whole Merixstudio team! We are already well ahead of 100 employees so the amount of data needed to download all those pictures would be tremendous and the loading times would be outrageous. So let’s lazy load all of them!
Html markup
This part will be really easy – just replace currently used image src with data name of your choice eg. data-src:
<img src=’my/images/myAwesomePicture.png’ alt=’my awesome picture’>
replace with
<img data-src=’my/images/myAwesomePicture.png’ alt=’my awesome picture’>
We don’t have to worry about html anymore, that’s literally all you have to do! Now let’s continue where we left off with IntersectionObserver in JavaScript.
Having fun with JavaScript
In case of a huge website, we’ll probably be using the lazy loading function in different places and passing different parameters to it so let’s define it as a class:
export class LazyLoad {
     constructor(element, options) {
           this.options = {
                 selector: ['data-src'],
                 rootMargin: ‘0px 0px 550px',
                 threshold: 0,
                 ...options,
           };

this.element = element;
           this.resources = this.element.querySelectorAll('[data-src]');

          this.init();
        }
    }
Let’s start with constructor. We pass in the element that contains assets we want to be lazy loaded. As a second argument, we pass additional options that can be defined each time the class is called. For that reason we use spread operator here. We have some predefined options like selector that we established in html and a rootMargin extending the top margin by 550px.
That’s where we also define our list of assets as resources simply by searching for elements with data-src as a selector. After all this initial setup we can initialize the main functionality.
 init() {
     const assetsObserver = new IntersectionObserver((entries, observer) => {
    //what this will do?
     }, this.options);
  }
In this line, we create new IntersectionObserver with callback as an ES6 arrow function and the options passed down from the constructor as the second argument. Callback function also takes two arguments entries and the assetsObserver as we want to reference back to it a little bit later.
Inside, we want to use forEach loop on entries. For now, let’s just use console.log(entry) and see what properties it has. For this actually to work, we have to start observing the resources. To do this, we can also use a forEach loop.
 init() {
     const assetsObserver = new IntersectionObserver((entries, assetsObserver) => {
    entries.forEach(entry => {
        console.log(entry);
});
     }, this.options);

    this.resources.forEach( resource => assetsObserver.observe(resource));
  }
Let’s run this and inspect the element we get in console.

As you can see, we get a lot of information about the entry with isIntersecting and target properties being of particular interest for us. They provide us with all the information we need to finish our work. Let’s get rid of that console.log and write some proper callback function!
 init() {
     const assetsObserver = new IntersectionObserver((entries, assetsObserver) => {
    entries.filter(entry => entry.isIntersecting).forEach(entry => {
         this._lazyLoadAsset(entry.target);
});
     }, this.options);

    this.resources.forEach( resource => assetsObserver.observe(resource);
  }
We only want to do something with our entry if the condition entry.isIntersecting is true. When target entry is Intersecting, we can get it’s data-src attribute that we passed in HTML and return the usual src to display that asset on page. I think a good practice would be to move this functionality outside of the observer.
  _lazyLoadAsset(asset) {
    const src = asset.getAttribute(this.options.selector);
    if(!src) {
      return;
    }
    asset.src = src;
 }
Here we add a little if statement to ensure everything goes as planned. I almost forgot to add a very important line in our code. Yes, you guessed it right, after the images have been loaded there is no need to observe them any further!
Now, let’s wrap the whole code together.
export class LazyLoad {
 constructor(element, options) {
   this.options = {
     selector: ['data-src'],
     rootMargin: '550px 0px',
     threshold: 0.01,
     ...options,
   };
   this.element = element;
   this.resources = this.element.querySelectorAll('[data-src]');

   this.bindEvents();
   this.init();
 }

 bindEvents() {
   this._lazyLoadAsset = this._lazyLoadAsset.bind(this);
 }

 init() {
   const assetsObserver = new IntersectionObserver((entries, assetsObserver) => {
     entries.filter(entry => entry.isIntersecting).forEach(entry => {
       this._lazyLoadAsset(entry.target);
       assetsObserver.unobserve(entry.target);
     });
   }, this.options);
   this.resources.forEach(resource => {
     assetsObserver.observe(resource);
   });
 }
 _lazyLoadAsset(asset) {
   const src = asset.getAttribute(this.options.selector);
   if (!src) {
     return;
   }
   asset.src = src;
 }
}
What we accomplished with lazy loading
I think the best way to show what we can accomplish with lazy loading is pure data so let’s run About Us in ‘develop’ environment with and without it.


That looks promising, doesn't it? We saved a lot of resources and precious time by simply adding a few lines of code to our page. I hope this article will help you improve the performance of your site as well!
Happy coding!
See how our developers can help you launch a JavaScript-fuelled project.


Navigate the changing IT landscape
Some highlighted content that we want to draw attention to to link to our other resources. It usually contains a link .
.svg)
.svg)
.svg)
.avif)

.avif)
.avif)
.avif)