.svg)
.webp)
If needed, here you can find previous parts of my article series:
Creating a mobile app in NativeScript (Pt 1)
Creating a mobile app in NativeScript (Pt 2)
Creating a mobile app in NativeScript (Pt 3)
In this article we will focus on:
- adding the ability to change game settings;
- implementing game settings and adding a time limit to answer the questions;
- listing the best results.
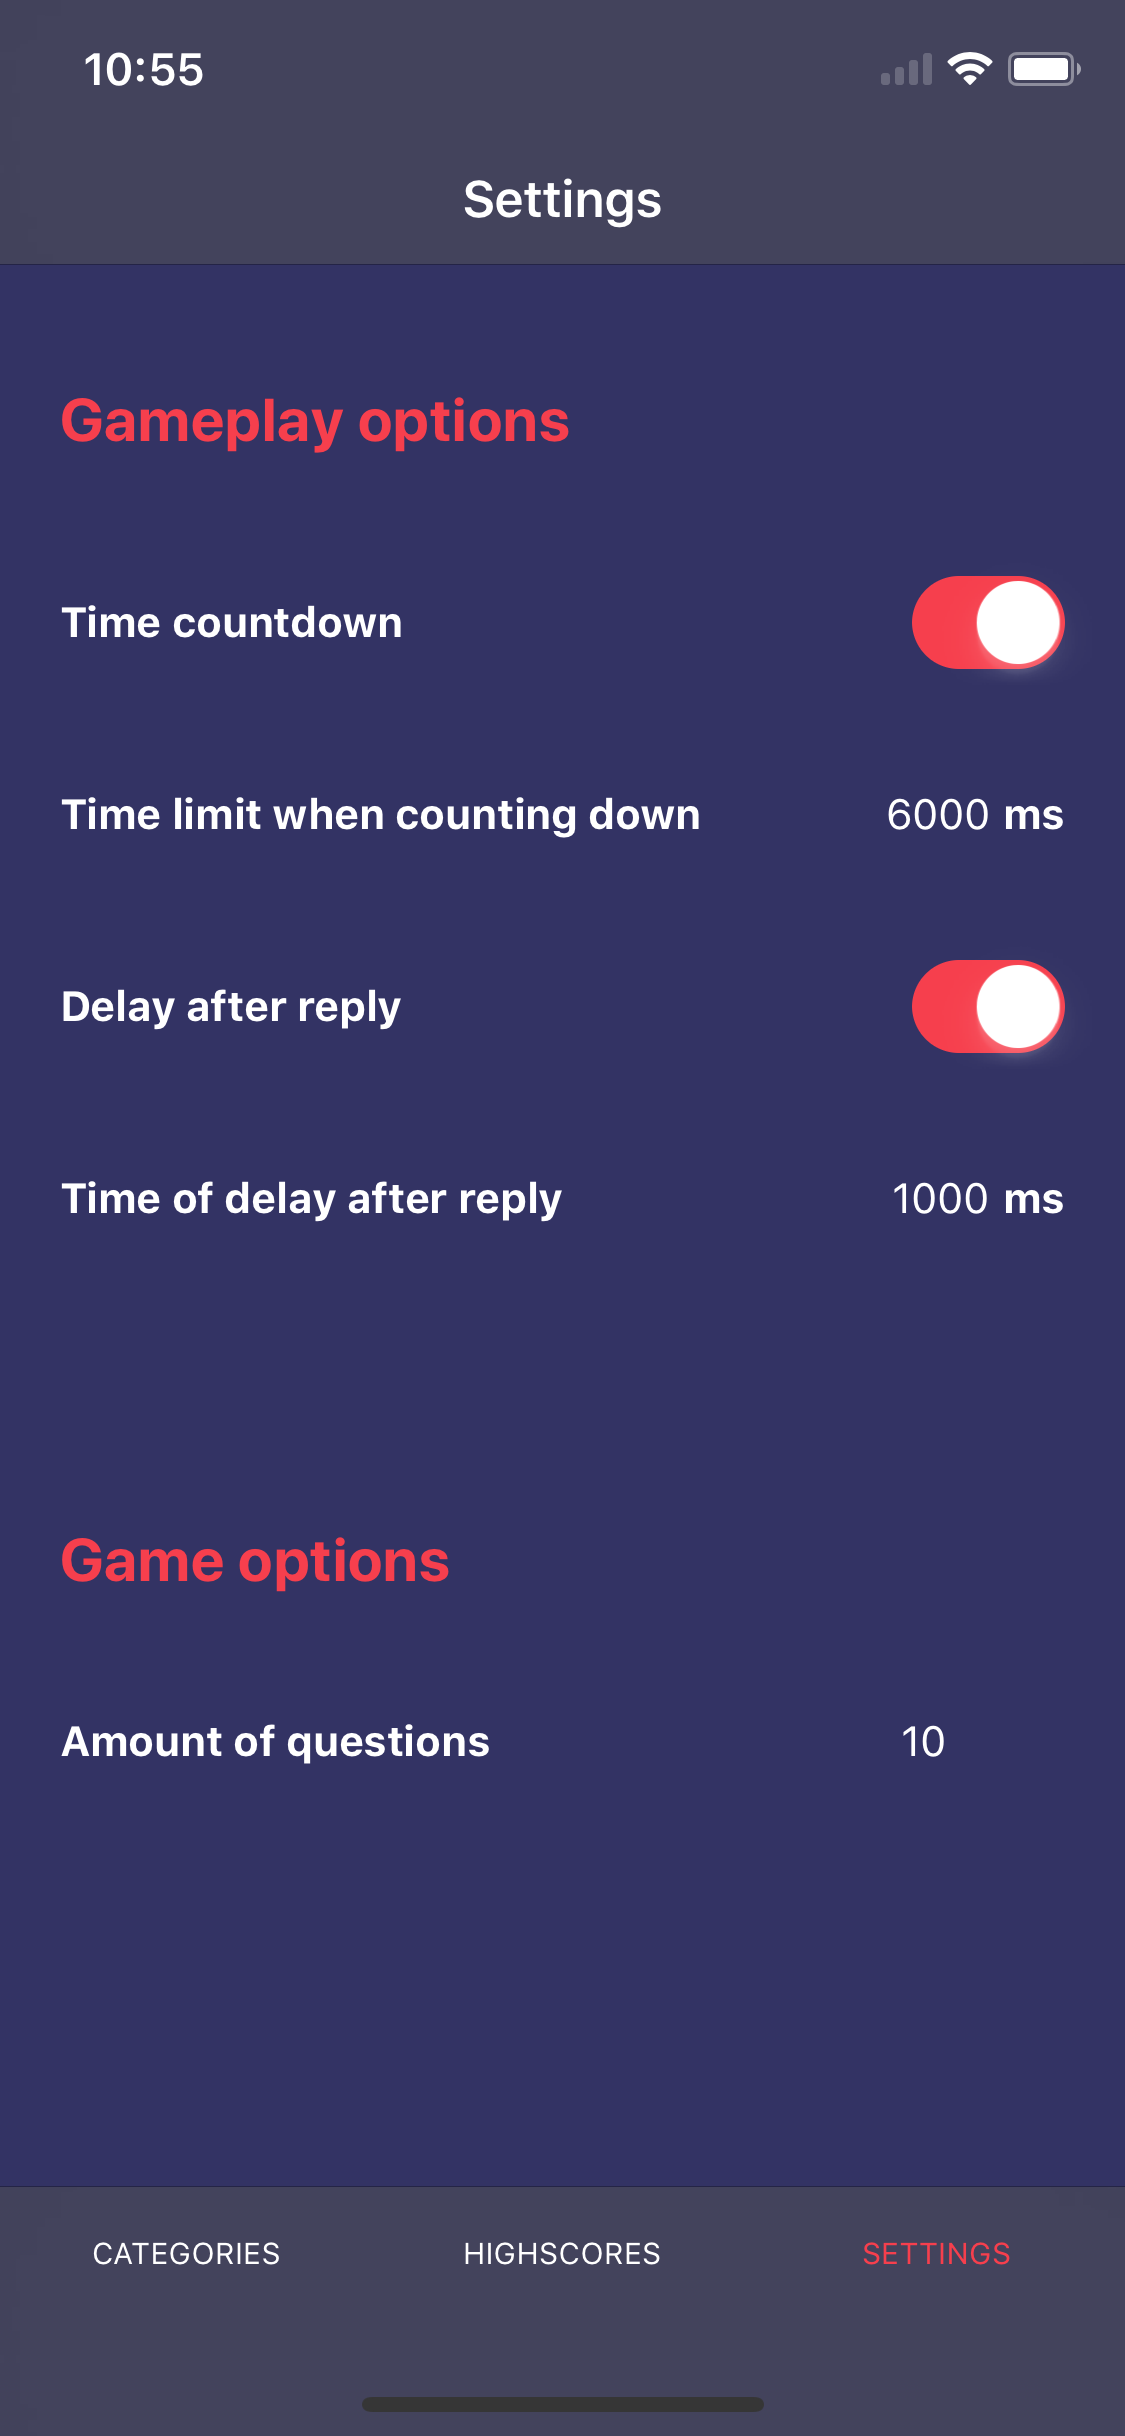
I would like our game to be flexible and to give us the opportunity to configure it in a convenient way for the user. Therefore, in the default settings, we will create a form in which you can decide whether during the game there should be a time limit for the game and if so, how long this limit should be. Another option will be the possibility of introducing a break after answering to think about its correctness and prepare for the next question. The last option will be the possibility to set the number of questions answered during one game. However, before we deal with the form itself, we need to create storage in which the game settings will be located and to which we will have access from the entire application. Of course, let's handle this with a new service.
ng generate service ./module/core/service/settings/settings --spec false
src/app/module/core/service/settings/settings.service.ts
import { Injectable } from '@angular/core';

@Injectable({
  providedIn: 'root'
})
export class SettingsService {
  private _timeCountdown: boolean = true;
  private _timeCountdownLimit: number = 6000;
  private _delay: boolean = true;
  private _delayTime: number = 1000;
  private _questionsAmount: number = 10;

  set timeCountdown(value) {
    this._timeCountdown = value;
  }

  get timeCountdown(): boolean {
    return this._timeCountdown;
  }

  set timeCountdownLimit(value) {
    this._timeCountdownLimit = value;
  }

  get timeCountdownLimit(): number {
    return this._timeCountdownLimit;
  }

  set delay(value) {
    this._delay = value;
  }

  get delay(): boolean {
    return this._delay;
  }

  set delayTime(value) {
    this._delayTime = value;
  }

  get delayTime(): number {
    return this._delayTime;
  }

  set questionsAmount(value) {
    this._questionsAmount = value;
  }

  get questionsAmount(): number {
    return this._questionsAmount;
  }
}
As you can see, this is a very simple service that stores our settings with default values and allows us to get and set them using the getter and setter methods.
Creating a time limitation
Now that we have created our SettingsService, we can go to the previously mentioned form.
src/app/module/settings/containers/settings/settings.component.ts
import { Component } from '@angular/core';
import { SettingsService } from '~/app/module/core/service/settings/settings.service';
import { TextField } from 'tns-core-modules/ui/text-field';
import { EventData } from 'tns-core-modules/data/observable';
import { Switch } from 'tns-core-modules/ui/switch';

@Component({
  selector: 'tg-settings',
  templateUrl: './settings.component.html',
  styleUrls: ['./settings.component.css'],
  moduleId: module.id,
})
export class SettingsComponent {

  constructor(
    private settingsService: SettingsService, // AD.1
  ) { }

  // AD.2
  onTextChange(args: EventData, name: string) {
    const textField = <TextField>args.object;

    this.settingsService[name] = textField.text;
  }

  // AD.3
  onCheckedChange(args: EventData, name: string) {
    const element = <Switch>args.object;

    this.settingsService[name] = element.checked;
  }

}
src/app/module/settings/containers/settings/settings.component.html
<StackLayout class="main">
  <ActionBar title="Settings" class="action-bar"></ActionBar>

  <ScrollView>
    <StackLayout>
      <StackLayout class="options-category">
        <Label
          class="title"
          text="Gameplay options"
        ></Label>

        <FlexboxLayout class="section">
          <Label text="Time countdown"></Label>
          <!-- AD.4 -->
          <Switch
            [checked]="settingsService.timeCountdown"
            (checkedChange)="onCheckedChange($event, 'timeCountdown')"
          ></Switch>
        </FlexboxLayout>

        <FlexboxLayout
          class="section"
          [ngClass]="{ 'section-disabled': !settingsService.timeCountdown }"
        >
          <Label text="Time limit when counting down"></Label>
          <FlexboxLayout class="textfield-container">
            <!-- AD.5 -->
            <TextField
              hint="Time"
              keyboardType="number"
              returnKeyType="done"
              autocorrect="false"
              maxLength="6"
              [text]="settingsService.timeCountdownLimit"
              [editable]="settingsService.timeCountdown"
              (textChange)="onTextChange($event, 'timeCountdownLimit')"
            ></TextField>
            <Label text="ms"></Label>
          </FlexboxLayout>
        </FlexboxLayout>

        <FlexboxLayout class="section">
          <Label text="Delay after reply"></Label>
          <!-- AD.6 -->
          <Switch
            [checked]="settingsService.delay"
            (checkedChange)="onCheckedChange($event, 'delay')"
          ></Switch>
        </FlexboxLayout>

        <FlexboxLayout
          class="section"
          [ngClass]="{ 'section-disabled': !settingsService.delay }"
        >
          <Label text="Time of delay after reply"></Label>
          <!-- AD.7 -->
          <FlexboxLayout class="textfield-container">
            <TextField
              hint="Time"
              keyboardType="number"
              returnKeyType="done"
              autocorrect="false"
              maxLength="6"
              [text]="settingsService.delayTime"
              [editable]="settingsService.delay"
              (textChange)="onTextChange($event, 'delayTime')"
            ></TextField>
            <Label text="ms"></Label>
          </FlexboxLayout>
        </FlexboxLayout>
      </StackLayout>

      <StackLayout class="options-category">
        <Label
          class="title"
          text="Game options"
        ></Label>
        <FlexboxLayout class="section">
          <Label text="Amount of questions"></Label>
          <!-- AD.8 -->
          <TextField
            hint="Amount"
            keyboardType="number"
            returnKeyType="done"
            autocorrect="false"
            maxLength="2"
            [text]="settingsService.questionsAmount"
            (textChange)="onTextChange($event, 'questionsAmount')"
          ></TextField>
        </FlexboxLayout>
      </StackLayout>
    </StackLayout>
  </ScrollView>
</StackLayout>
- AD.1 - as with other services, we attach SettingsService to our container to be able to use it;
- AD.2 - a method that will be listening to changes on form widget TextField, when called it will set the value for the corresponding option in the service
- AD.3 - an event handler method that will be called whenever the change event of the Switch form widget occurs, then it changes the value of the corresponding option on the service;
- AD.4 - the form field in which we decide whether the time should be counted down when answering or not. For this purpose, we use the Switch widget, which with each change calls the onCheckedChange method, to which in the second argument we pass the name of the option being changed;
- AD.5 - form field in which we enter how much time (milliseconds) the question should be displayed. If the switch from AD.4 is unchecked, then the text field is blocked. For this purpose, we use the TextField widget, which with each change calls the onTextChange method, to which in the second argument we pass the name of the option being changed;
- AD.6 - a form field in which we decide whether there should be a delay after each answer. For this purpose, we use the Switch widget, which with each change calls the onCheckedChange method, to which in the second argument we pass the name of the option being changed;
- AD.7 - form field in which we enter how much time (milliseconds) the delay should last. If the switch from AD.6 is unchecked then this text field is blocked. For this purpose, we use the TextField widget, which with each change calls the onTextChange method, to which in the second argument we pass the name of the option being changed;
- AD.8 - form field in which we enter the number of questions we get per game. For this purpose, we use the TextField widget, which with each change starts the onTextChange method, to which in the second argument we pass the name of the option being changed.
Adding a time bar - countdown feature
Now we can apply SettingsService directly to the game logic and add a countdown feature to each question. We want the bar to appear at the very top during the game, and this bar will decrease with the timer counting down for a given question. We are going to use a GridLayout to create the time bar.
src/app/module/game/containers/questions/questions.component.ts
import { Component, OnDestroy, OnInit } from '@angular/core';
import { ActivatedRoute } from '@angular/router';
import { Button } from 'tns-core-modules/ui/button';
import { EventData } from 'tns-core-modules/data/observable';
import { RouterExtensions } from 'nativescript-angular';
import { GameService } from '~/app/module/core/service/game/game.service';
import { SettingsService } from '~/app/module/core/service/settings/settings.service';
import { Question } from '~/app/module/core/entity/question/question';

@Component({
  selector: 'tg-questions',
  templateUrl: './questions.component.html',
  styleUrls: ['./questions.component.css'],
  moduleId: module.id,
})
export class QuestionsComponent implements OnInit, OnDestroy {
  private categoryId: string;
  private difficulty: string;
  private questions: Question[];
  private currentQuestion: Question;
  private currentQuestionIndex: number;
  private questionsAmount: number;
  private isLoading: boolean;
  private intervalRef: number;
  private columns: string;
  private countdownPercent: number;
  private preview: boolean;
  private timeCountdownLimit: number;
  private delayTime: number;
  private timeCountdown: boolean;
  private delay: boolean;

  constructor(
    private route: ActivatedRoute,
    private routerExtensions: RouterExtensions,
    private gameService: GameService,
    private settingsService: SettingsService, // AD.1
  ) { }

  ngOnInit() {
    this.isLoading = true;

    this.timeCountdownLimit = this.settingsService.timeCountdownLimit; // AD.2
    this.delayTime = this.settingsService.delayTime; // AD.2
    this.timeCountdown = this.settingsService.timeCountdown; // AD.2
    this.delay = this.settingsService.delay; // AD.2

    this.route.queryParams.subscribe((params) => {
      this.questionsAmount = this.settingsService.questionsAmount; // AD.2
      this.categoryId = params['categoryId'];
      this.difficulty = params['difficulty'];

      this.gameService.reset();

      this.gameService.getQuestions(this.categoryId, this.difficulty, this.questionsAmount)
        .subscribe(({ results }) => {
          this.setProgressbarWidth(100); // AD.4

          this.questions = results;
          this.currentQuestionIndex = 0;
          this.currentQuestion = results[this.currentQuestionIndex];
          this.questionsAmount = results.length;
          this.isLoading = false;

          // AD.5
          if (this.timeCountdown) {
            this.runCountdown();
          }
        });
    });
  }

  // AD.6
  ngOnDestroy() {
    clearInterval(this.intervalRef);
  }

  // AD.3
  setProgressbarWidth(percent) {
    this.columns = percent + '*,' + (100 - percent) + '*';
  }

  // AD.7
  runCountdown() {
    const totalTime = this.timeCountdownLimit / 10;
    let countDownTime = this.timeCountdownLimit / 10;
    this.countdownPercent = 100;

    this.intervalRef = setInterval(() => {
      countDownTime = countDownTime - 1;
      this.countdownPercent = (countDownTime * 100) / totalTime;

      this.setProgressbarWidth(this.countdownPercent);
      if (this.countdownPercent < 0) {
        clearInterval(this.intervalRef);
        this.setAnswer(null, '', 0);
      }
    }, 10);
  }

  setAnswer(event: EventData | null, answer: boolean | '', timeout: number = 1000) {
    if (this.preview) return; // AD.8

    clearInterval(this.intervalRef); // AD.9
    this.preview = true; // AD.8
    let ref;

    // AD.10
    if (event) {
      ref = <Button>event.object;
      ref.class = 'answer-button selected';
    }

    this.gameService.setAnswer(
      this.currentQuestion.question,
      answer,
      JSON.parse(this.currentQuestion.correct_answer.toLowerCase()),
    );

    // AD.12
    if (!this.delay) {
      timeout = 0;
    }

    // AD.11
    setTimeout(() => {
      this.nextQuestion();

      if (event) {
        ref.class = 'answer-button';
      }
    }, timeout);
  }

  nextQuestion() {
    this.preview = false; // AD.8
    this.currentQuestionIndex += 1;
    this.currentQuestion = this.questions[this.currentQuestionIndex];

    if (!this.currentQuestion) {
      return this.routerExtensions.navigate(['game', 'result']);
    }

    // AD.5
    if (this.timeCountdown) {
      this.runCountdown();
    }
  }

  getQuestion() {
    let question: string = '';

    if (this.currentQuestion) {
      question = this.currentQuestion.question;
    }

    return question;
  }
}
- AD.1 - we attach SettingsService to our container to be able to use it;
- AD.2 - we get the currently set options and save them to the QuestionsComponent class property;
- AD.3 - a method by which it will transfer the number of columns in GridLayout, thanks to which we will achieve the effect of a decreasing bar. Eg "100 *, 0 *" will display the bar at 100% width, and "25 *, 75 * will display the bar at 25% width;
- AD.4 - we set 100% of the bar width at the beginning of the game;
- AD.5 - if the countdown option is enabled, we run a new runCountdown method, which will be responsible for it;
- AD.6 - we are going to use the setInterval method, which will count down indefinitely until we interrupt it. Therefore, if the user switches to another view during the game, we will delete the interval because it will no longer be needed;
- AD.7 - runCountdown method, in which - based on the remaining time - we calculate every 10ms the current width of the bar and set it using the setProgressbarWidth method. In case the time runs out and the user has not answered, we run the setAnswer method with an empty answer;
- AD.8 - if the user has already answered the question once, we block the possibility of replying. We need this functionality because we have added the pause option after answering the question;
- AD.9 - if the user has answered, we stop the countdown by removing the interval;
- AD.10 - after answering on the selected button, we add the "selected" CSS class so that the user can be sure which answer he has chosen;
- AD.11 - we use the setTimeout method to add a time pause after answering. After the time runs out, we display the next question;
- AD.12 - if the time pause is disabled in the options, we set this time to 0, which is equal to no pause.
src/app/module/game/containers/questions/questions.component.html
<ng-container *ngIf="isLoading; else game">
  <GridLayout
    class="main"
    columns="*"
    rows="*"
  >
    <ActionBar title="Questions - Loading" class="action-bar"></ActionBar>

    <ActivityIndicator
      row="2"
      colspan="2"
      busy="true"
      width="40"
      height="40"
      class="activity-indicator"
    ></ActivityIndicator>
  </GridLayout>
</ng-container>

<ng-template #game>
  <StackLayout class="main">
    <ActionBar title="Questions" class="action-bar"></ActionBar>

    <ng-container *ngIf="questions.length; else noQuestions">
      <!-- AD.1 -->
      <GridLayout [columns]="columns" class="progressbar">
        <StackLayout col="0" class="progressbar-value"></StackLayout>
      </GridLayout>

      <GridLayout
        class="main"
        columns="*, *"
        rows="*, auto, *, auto, *, auto, *, auto"
      >
        <Label
          row="1"
          [text]="'Question ' + (currentQuestionIndex + 1) + ' of ' + questionsAmount"
          class="question-number"
          colspan="2"
        ></Label>
        <Label
          row="3"
          class="question-text"
          textWrap="true"
          colspan="2"
          [text]="getQuestion() | entityDecode"
        ></Label>

        <!-- AD.2 -->
        <Button
          text="False"
          row="7"
          col="0"
          class="answer-button"
          (tap)="setAnswer($event, false, delayTime)"
        ></Button>
        <!-- AD.2 -->
        <Button
          text="True"
          row="7"
          col="1"
          class="answer-button"
          (tap)="setAnswer($event, true, delayTime)"
        ></Button>
      </GridLayout>
    </ng-container>

    <ng-template #noQuestions>
      <GridLayout columns="*" rows="*, auto, *">
        <StackLayout
          row="1"
          class="no-questions"
        >
          <Label
            class="no-questions-title"
            text="Error"
          ></Label>
          <Label
            class="no-questions-description"
            text="No questions in this category in our database"
            textWrap="true"
          ></Label>
        </StackLayout>
      </GridLayout>
    </ng-template>
  </StackLayout>
</ng-template>
- AD.1 - we pass the columns property to GridLayout, which dynamically changes, thanks to which the effect of a decreasing bar is created;
- AD.2 - to the answer buttons created in the previous article, as a result of taping, we pass additional delayTime, which is got from the settings.
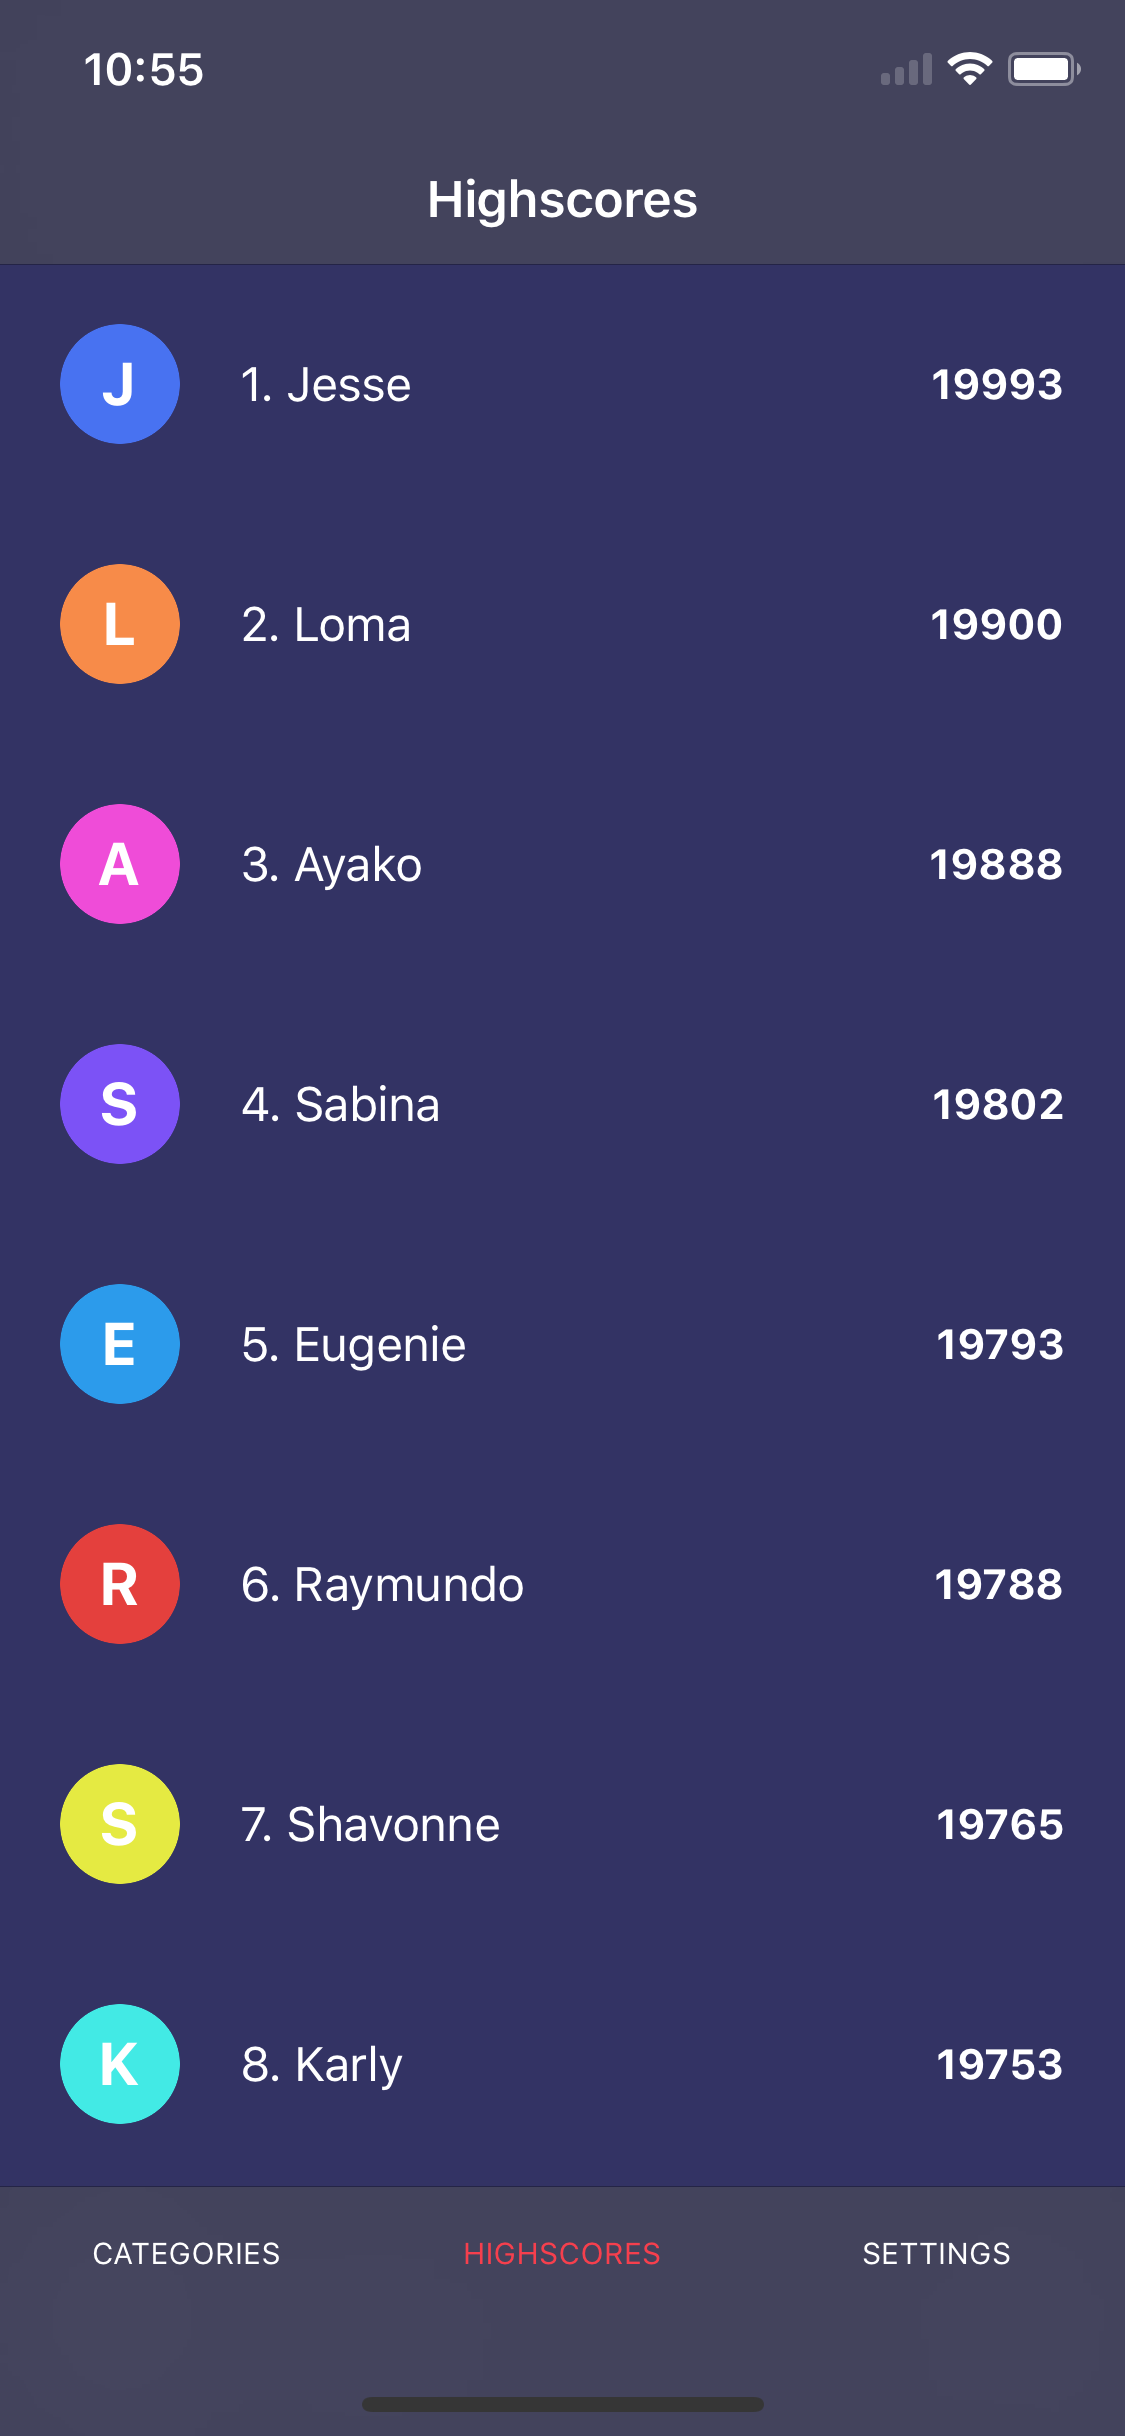
Displaying the list of the best users
At the moment our application is almost finished, only the last tab on which we will display the users who have obtained the highest points is left. Unfortunately, due to the fact that we use the public API, not our own, we have no way to get the results and save them via the API. Therefore, we are going to create a service that will only simulate getting the list of the best players and then display them. We start by generating a new service and a necessary interface to avoid using any type.
ng generate interface ./module/core/entity/score/score
ng generate service ./module/core/service/highscores/highscores --spec false
Now we write the code for our new files, and then I’ll explain the spots that may raise doubts.
src/app/module/core/entity/score/score.ts
export interface Score {
  name: string,
  points: string,
}
src/app/module/core/service/highscores/highscores.service.ts
import { Injectable } from '@angular/core';
import { Score } from '~/app/module/core/entity/score/score';

@Injectable({
  providedIn: 'root'
})
export class HighscoresService {
  // AD.1
  private list = new Array<Score>(
    { name: 'Jesse', points: '19993' },
    { name: 'Loma', points: '19900' },
    { name: 'Ayako', points: '19888' },
    { name: 'Sabina', points: '19802' },
    { name: 'Eugenie', points: '19793' },
    { name: 'Raymundo', points: '19788' },
    { name: 'Shavonne', points: '19765' },
    { name: 'Karly', points: '19753' },
    { name: 'Stanford', points: '19732' },
    { name: 'Rosalina', points: '19722' },
    { name: 'Vennie', points: '19711' },
    { name: 'Nerissa', points: '19632' },
    { name: 'Christena', points: '19543' },
    { name: 'Brandee', points: '19421' },
    { name: 'Shellie', points: '19333' },
    { name: 'Mirtha', points: '19209' },
    { name: 'Alleen', points: '19124' },
    { name: 'Sally', points: '18992' },
    { name: 'Ashlee', points: '18901' },
    { name: 'Ellena', points: '18888' },
    { name: 'Cleta', points: '17435' },
    { name: 'Inez', points: '16434' },
    { name: 'Sang', points: '15543' },
    { name: 'Sherlene', points: '14321' },
    { name: 'Shalonda', points: '13654' },
    { name: 'Antione', points: '12763' },
    { name: 'Kellie', points: '11275' },
    { name: 'Lorena', points: '10537' },
    { name: 'Cindy', points: '9854' },
    { name: 'Audrie', points: '9814' },
    { name: 'Latoria', points: '9754' },
    { name: 'Rachell', points: '9632' },
    { name: 'Beau', points: '8432' },
    { name: 'Debera', points: '8112' },
    { name: 'Faustina', points: '7432' },
    { name: 'Tyisha', points: '6932' },
    { name: 'Lucina', points: '5751' },
    { name: 'Rolande', points: '4641' },
    { name: 'Wilbur', points: '3657' },
    { name: 'Laree', points: '2632' },
    { name: 'Ben', points: '1742' },
    { name: 'Tommy', points: '1253' },
    { name: 'Rikki', points: '954' },
    { name: 'Breana', points: '654' },
    { name: 'Iraida', points: '531' },
    { name: 'Talisha', points: '453' },
    { name: 'Kandace', points: '329' },
    { name: 'Jestine', points: '251' },
    { name: 'Pedro', points: '42' },
    { name: 'Rana', points: '12' },
  );

  // AD.2
  getList(): Score[] {
    return this.list;
  }
}
- AD.1 - we create a private class property in which we rigidly write the list that we would normally receive from the API;
- AD.2 - getList method, which returns the entire result list.
Now just display the user list in the highscores tab.
src/app/module/highscores/containers/highscores-list/highscores-list.component.ts
import { Component, OnInit } from '@angular/core';
import { HighscoresService } from '~/app/module/core/service/highscores/highscores.service';
import { isIOS } from 'tns-core-modules/platform';
import { Score } from '~/app/module/core/entity/score/score';

declare var UITableViewCellSelectionStyle;

@Component({
  selector: 'tg-highscores-list',
  templateUrl: './highscores-list.component.html',
  styleUrls: ['./highscores-list.component.css'],
  moduleId: module.id,
})
export class HighscoresListComponent implements OnInit {
  private highscores: Score[];

  constructor(
    private highscoresService: HighscoresService, // AD.1
  ) { }

  ngOnInit() {
    this.highscores = this.highscoresService.getList(); // AD.2
  }

  // AD.3
  onItemLoading(args) {
    if (isIOS) {
      const iosCell = args.ios;
      iosCell.selectionStyle = UITableViewCellSelectionStyle.None;
    }
  }
}
src/app/module/highscores/containers/highscores-list/highscores-list.component.html
<StackLayout class="main">
  <ActionBar title="Highscores" class="action-bar"></ActionBar>

  <!-- AD.4  -->
  <ListView
    class="list"
    separatorColor="#333364"
    [items]="highscores"
    (itemLoading)="onItemLoading($event)"
  >
    <!-- AD.5  -->
    <ng-template let-score="item" let-i="index + 1">
      <FlexboxLayout class="list-item">
        <StackLayout orientation="horizontal">
          <!-- AD.6  -->
          <Label
            [class]="'avatar color-' + (i + 0) % 10"
            [text]="score.name[0]"
          ></Label>
          <Label
            [text]="i + '. ' + score.name"
            class="name"
          ></Label>
        </StackLayout>
        <Label
          [text]="score.points"
          class="points"
        ></Label>
      </FlexboxLayout>
    </ng-template>
  </ListView>
</StackLayout>
- AD.1 - we attach HighscoresService to our container to be able to use it;
- AD.2 - we get a list of the best results;
- AD.3 - on iOS devices, after tapping on a list item, the backlight effect appears. In our case, we want to turn off this effect because it suggests that something should happen.
- AD.4 - we use the ListView widget, which works very well for displaying large lists;
- AD.5 - any element of the list can consist of several elements directly inside ListView, so it is good to wrap it in ng-template;
- AD.6 - we create a user avatar that will consist of the first letter of the player's nickname. In addition, based on the iteration index, we create a CSS class that will be responsible for the avatar color. We take the rest from dividing the index by 10, thanks to which we get numbers from 0-9.
Finishing touches
Now we just need to add missing CSS, that’s why I encourage you to switch to the next, and the last, branch.
git checkout master
git pull origin master
And here we are! Our mobile application is ready. I hope that thanks to this short series of articles you have gained the basic knowledge of creating mobile applications in NativeScript and that I encouraged you to expand your knowledge in this area. To test our application on a mobile device in a simple way, you only need to download from the AppStore or Google Play an application called "Nativescript Playground" and then run the following command in the terminal
tns preview
A QR code will be displayed, and you only need to scan it using the Nativescript Playground application. After a moment, our application should load on your phone. If you are interested in publishing applications on the AppStore or Google Play, there are comprehensive guides on NativeScript documentation for both iOS and Android.
Want to create apps in cross-platform frameworks with our devs? Check our job offers and join Merixstudio team!


Navigate the changing IT landscape
Some highlighted content that we want to draw attention to to link to our other resources. It usually contains a link .
.svg)
.svg)
.svg)
.avif)

.avif)
.avif)
.avif)