.svg)
.webp)
There is no doubt that quality assurance is an important and beneficial part of app development process and best software houses have extended QA services range by e.g. offering API tests. With the growing significance and need for an effective testing process more and more methods and tools are showing up.
Pros and Cons of WebdriverIO
WebdriverIO is an opensource JavaScript framework that facilitates writing automated tests, compatible with TDD or BDD process. What’s more about it is that we really use Node.js as WebdriverIO is only a binding. IT makes QA process easier not only because of test automation but also because the test code is written in JavaScript - just like the frontend code. This is great for web browser applications which are in this case “frontend friendly” and allows us closer cooperation with our JS devs. In below example you can catch the difference in code between drag and drop action in WebdriverIO and Selenium Webdriver using Python:
- Drag and drop using WebdriverIO:
$(selector).dragAndDrop(target, duration)
- Drag and drop using Selenium Webdriver (Python):
from selenium.webdriver.common.action_chains import ActionChains

ActionChains(driver).drag_and_drop(source_element, dest_element).perform()
Believe us, WebdriverIO code is better not only because it looks nicer but it is also just more effective.
ProsCons Readable, simple syntax Incomplete API documentation Easy to start Assertions are problematic at the beginning Simple and fast configuration Debugging possible only through WDIO task runner Committed community You can run your tests using WDIOTestrunner or Standalone Mode Works with many assertion librariesand testing frameworks (Jasmine, Mocha, Cucumber) Enables running tests on desktop as well as on mobile
As you can see, there are only a few things you might find uncomfortable about using WebdriverIO and for us, the advantages were much more important. It’s very beneficial that it can be used with many different test frameworks so it’s easy to switch to it from other test automation tools. It allowed us to perform automated tests for different apps in our software house without too much hassle.
WebdriverIO Setup
Now let’s get to work! In the next steps we will show you how to setup WebdriverIO and how to write easy, basic test.
Steps to set up our environment:
- Create a separated location for your tests environment and open terminal.
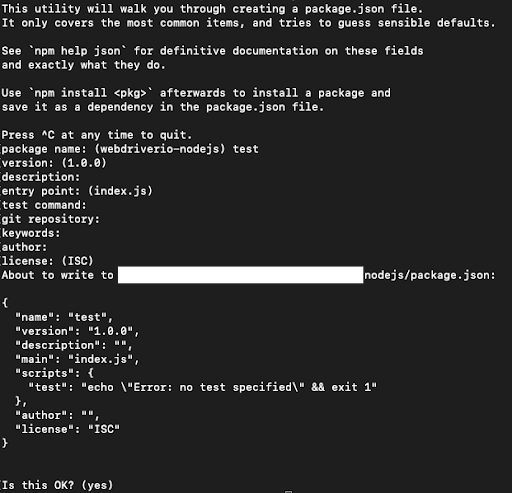
- Create the package.json file by typing npm init.
During the package.json file creation, you will be asked to fill some fields like the description of the package or name of the git repository. For our test purpose, you can skip these steps.
- Install WebdriverIO
To install, type this command in the console:
npm install webdriverio
- WebdriverIO config file creator
Firstly, enter this command:
./node_modules/.bin/wdio
and then, when configuration helper will appear, choose these options:
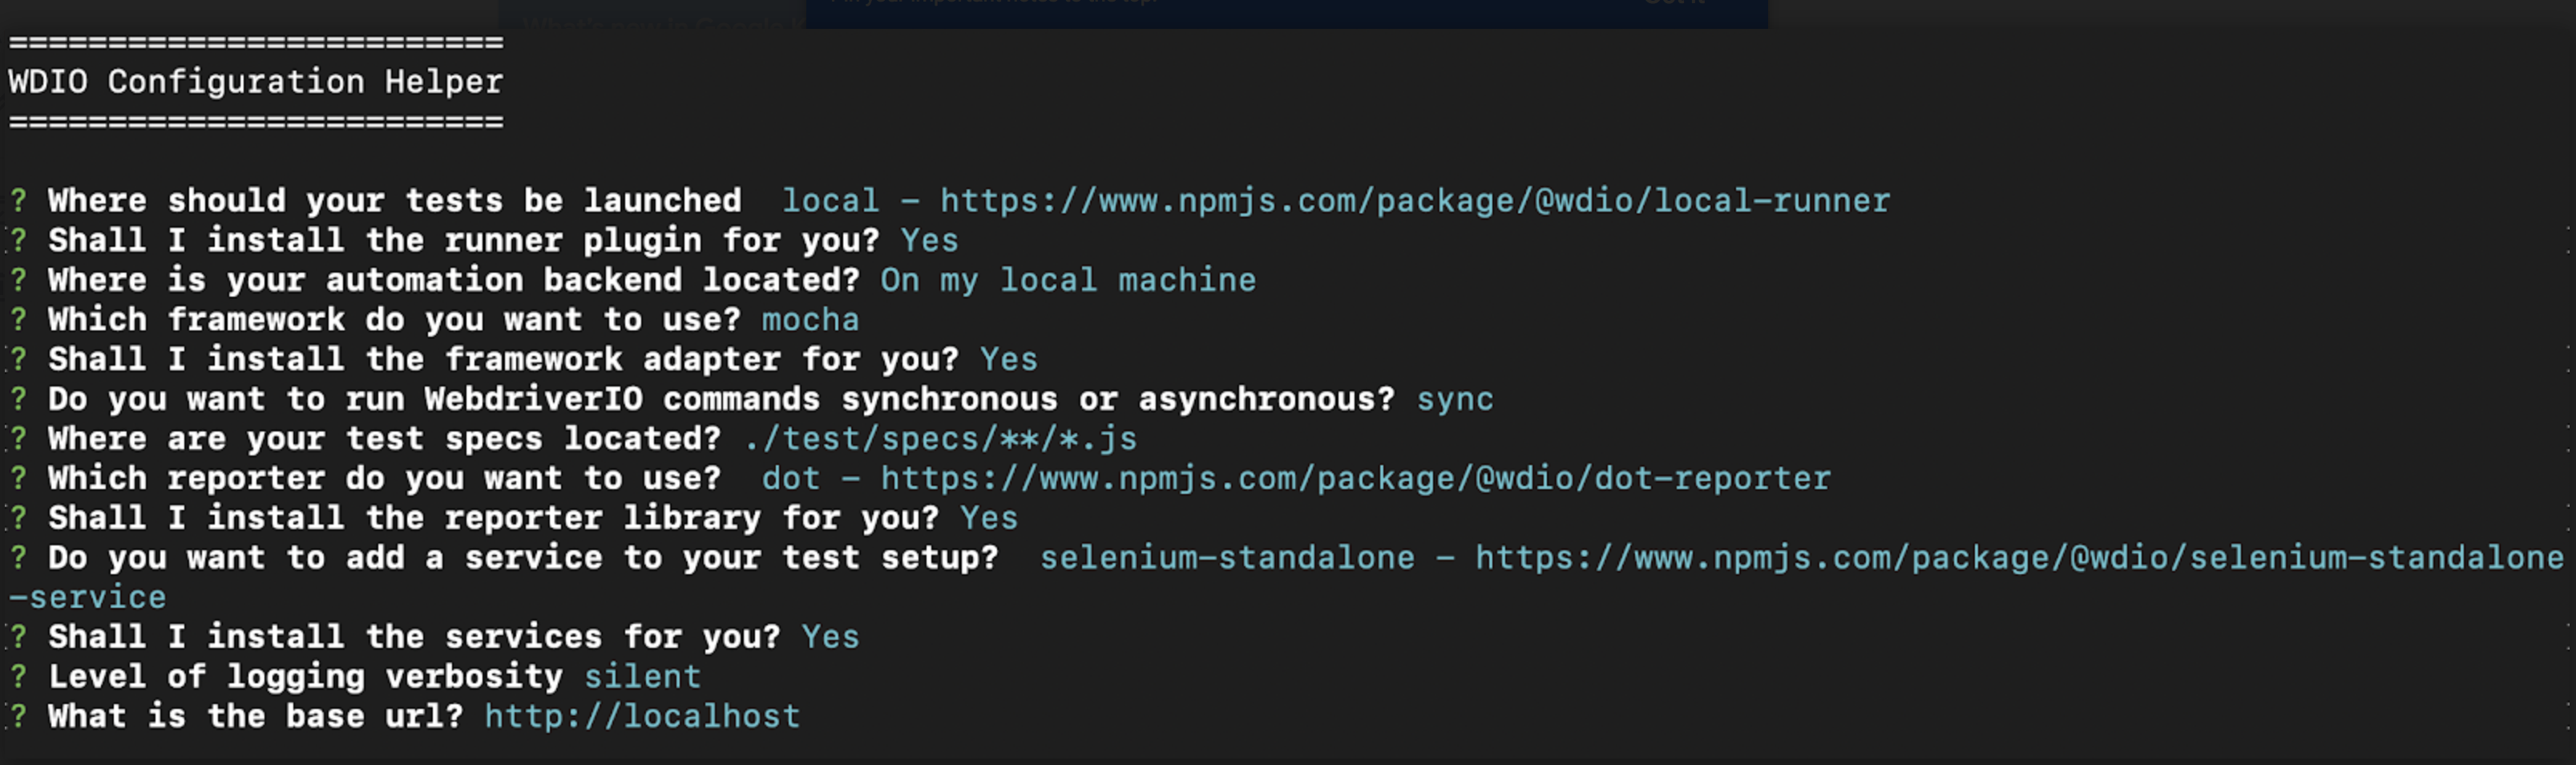
Now config file is ready and should be saved as wdio.conf.js
Create new JS file in directory “./test/specs/**/*.js” - this will be your file for writing our first test (** represents a name you find suitable. You can also put your spec files directly in specs directory).
- Selenium Standalone configuration in 3 steps:
- Download:
npm install selenium-standalone - Install:
./node_modules/.bin/selenium-standalone install - Start:
./node_modules/.bin/selenium-standalone start
Remember about starting selenium standalone server, always before tests.
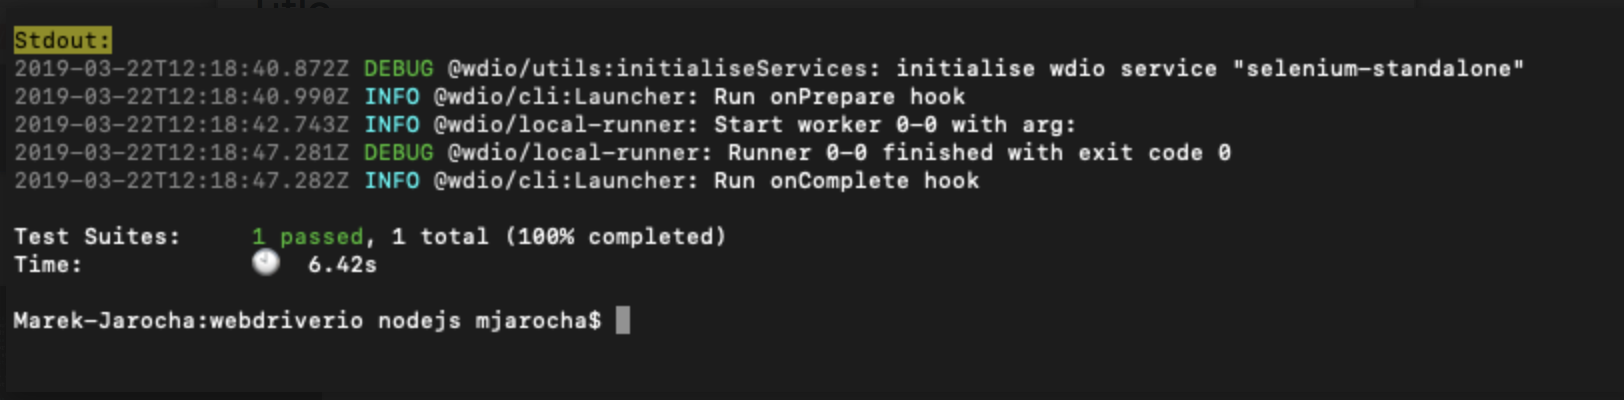
- Kick Off Testrunner
Run:
./node_modules/.bin/wdio
The expected result of running an empty test file:
Automated test example in WebdriverIO
Let’s try to run our first valuable test. Copy and paste this code to your test file:
const assert = require('assert');

describe('Search input on webdriver.io page', () => {

    it('should search “drag and drop” page, () => {
      browser.url('https://webdriver.io');
      const searchInput = $('#search_input_react')
      searchInput.setValue('drag and drop')
      const searchDropdown = $('.algolia-docsearch-suggestion__main')
      searchDropdown.click();
      const title = browser.getTitle();
      assert.equal(title, 'dragAndDrop · WebdriverIO');
    });
});
Run the test and check if everything is working fine for you. Verify these conditions step by step :
- a browser is opened
- a value “drag and drop” is set to the search bar
- the search results inside the dropdown appear
- a search result is clicked and a page is redirected to “Drag and drop” page
- next step (invisible to the user) is an assertion. We are checking if the title of “Drag and drop” page is correct
- in the end, a browser is closed and test results are visible.
If all of the mentioned actions work correctly you should receive the same result.
Page Object Pattern
To make your automated tests code more readable and reusable, it’s a good idea to use Page Object Pattern. When you have many pages to test and a bunch of elements’ locators to keep, it can become a real problem when something has to be changed. Finding the right part of the code and modifying it, especially when it’s repeatable, can be not only frustrating but also a waste of time. With the Page Object Pattern, such changes become faster and easier. Let’s take a look at how to implement this with WebdriverIO.
First, you need to create a directory where you’ll keep your pages. We recommend to create it in the same directory as your specs, so ./test/pages/. Then, you can proceed and create the first base page that other ones will inherit from. It will store repeatable locators and functions so that you don’t have to define and implement them again and again for different pages.
A base page object can look like this:
export default class BasePage {
    constructor() {
        this.title = 'Test Page';
    }

    open(path) {
        browser.url(path);
    }
}
It’s a skeleton recommended in WebdriverIO docs. Once you got this, you can create another page that will inherit from the base page. In my example, it’s a guide page of the Webdriver.io website, with the elements that were shown in the previous example.
import BasePage from './pages';

class GuidePage extends BasePage {

    get searchInput() { return $('#search_input_react'); }
    get searchDropdown() { return $('#password.algolia-docsearch-suggestion__main'); }

    open() {
        super.open('docs/gettingstarted.html');
    }

    clickSearch() {
        this.searchDropdown.click();
    }

    useSearch(searchValue) {
        this.searchDropdown.setValue(searchValue);
    }

}

export default new GuidePage();
In the first line, we import our base page. Then we create a new one, called GuidePage, that inherits from BasePage. Inside, we have two element getters defined - for the search input and search dropdown. There are also three functions - one that we had in our base page (therefore we use super), the second - to click on the search and finally the third one to search a given parameter.
This is a basic example of how to create a page object - for more information you can visit official documentation.
Done!
Now you are able to write more automated tests using Page Object Pattern. In the future you will encounter more challenges, such as gulp for standalone mode, Chai for assertions, babel setup, changing typescript to ES6 and many others :) But don’t be afraid, you can find more help on webdriver.io website or within Github community which is still intensively growing and becoming more and more active. If you are still not convinced as to why you should write automated tests in the first place, check out Dorota’s article about the benefits of test automation.


Navigate the changing IT landscape
Some highlighted content that we want to draw attention to to link to our other resources. It usually contains a link .
.svg)
.svg)
.svg)
.avif)

.avif)
.avif)
.avif)