.svg)
.webp)
Real-time communication
Let’s start with the basic question: what does real-time communication mean? We can define it as the ability to get resources when they are available and add new ones when we want to. Considering this definition another question shows up - can we call harnessing REST API to ask about resources once per second or even more frequently a real-time communication?

In this case, it means that we will get the resources automatically after the server receives it and propagate it to the clients. That’s the purpose WebSockets was created and we will explore this topic in the following article.
WebSockets + Node.js - a perfect match for RTC
By the definition on the Mozilla website:
The WebSocket API is an advanced technology that makes it possible to open a two-way interactive communication session between the user's browser and a server. With this API, you can send messages to a server and receive event-driven responses without having to poll the server for a reply.
But what it actually means? It means that at a single connection with the server we can send new data to it and also receive the data from the server.

Source: microsoft.com
In the example app for real-time communication, we will combine WebSockets with Node.js. Why is that? Well, honestly, there is no good or bad language to use with it. But as we've mentioned in his article, the V8 engine of Node.js is just made to serve real-time server applications. Besides, it’s based on JavaScript just like the one used in the web browser, so we can use the same language on both - frontend and backend.
The real-time communication app step by step
Since we know what WebSockets are and we decided to use Node.js with it, we can now create our example project. We will write a simple chat application within which we can assign our name and send a message to others.
Stack
We will use Node.js v14.11.0, ws package, and a new feature of Node.js with modules import (you can learn how to do it step by step in here). For testing WS connections we can pick Chrome’s extension WebSocket Test Client. It is very simple yet effective tool enabling us to check if the connection is working as we expect it to.
Installation
I believe you are familiar with Node.js and already have it installed, but if not - just download it from the official website. Of course, to start our project, we also need to install WebSocket package.
npm install websocket
// or with yarn
yarn add websocket
Now we have to create index.js file where we will create our Websocket server.
import WebSocket from 'ws';

const wss = new WebSocket.Server({
  port: 8080,
});
And that’s it, we created our first WebSockets server :) You can run it from the console node index.js.
Websocket server
Unlike HTTP servers, WebSockets ones don’t have any routes by default because it is just not needed. In this protocol, you just use a string to send and receive information (a good practice is to send a JSON object serialized to a string). That’s why the configuration is so simple, still, it’s not the end. Now we have to handle connections to the server, receive data from clients, and send them to the other participants in our chat.
Join the chat
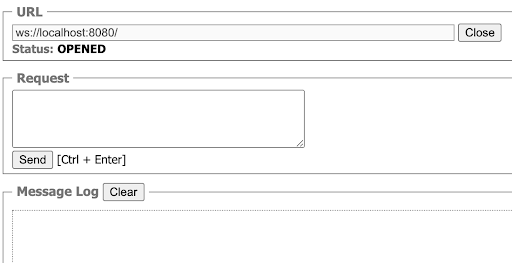
Now that we have our basic server we can connect to it. To do so we just need an address and this is very simple to achieve as we run it locally and we know the host will be localhost. We also defined the port number to 8080 so the URL will be localhost:8080 although you can not insert this to your browser’s address bar - it’s not HTTP/S protocol. To connect with WebSockets we need its client. Like I mentioned earlier, I will use Chrome’s extension for a quick connection with the sockets.
Knowing the address of the server and the fact that webcockets have their own protocol, we have to add now ws:// at the beginning of the URL. To connect to our server we should provide ws://localhost:8080/ as a URL.
Don’t be surprised that after establishing a connection nothing will appear. We do not have anything that could be returned to the connected clients yet.
To notify users that they are joining our chat we have to send them information. But first, we have to know that a user joined us. To achieve this we have to listen to an event connection in our server.
wss.on('connection', () => {});
connection is one of a few events that can be listened to and this particular one is responsible for informing when a new client connected to our server.
But this event listener does nothing at this point, so let’s extend it.
As the first parameter of the callback, we will have an instance of the client’s websockets. Thanks to that we will be able to send him the data.
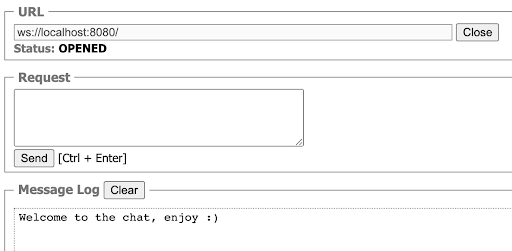
wss.on('connection', (ws) => {
  ws.send('Welcome to the chat, enjoy :)');
});
ws.send is a function that allows us to send data to a particular client that has just connected to our server. Other participants who are already connected will not receive that message.
Now, when a user connects to our chat he will see a message informing him about it.
Sending a message
We’ve got a server informing users when they connect to it but what about sending messages to other people that also joined our chat? Fortunately, the WebSocket server has a list of clients that are connected to it, so we can pass them any data sent to the server.
Now we have to get this list and pass data to them.
wss.on('connection', (ws) => {
  ws.send('Welcome to the chat, enjoy :)');

  ws.on('message', (data) => {
    wss.clients.forEach((client) => {
      if (client.readyState === WebSocket.OPEN) {
        client.send(data);
      }
    });
  });
});
Again we are using event listener but now we are doing it on a particular client instead of the whole server. The event message is responsible for informing when a user sends us a new message and in the callback, we are receiving it.
Our server has a client list and we can iterate over it. When we have a client we need to check its connection status, that’s why we are checking if client.readyState === WebSocket.OPEN. If the status is ok we are sending the message we received from the client.
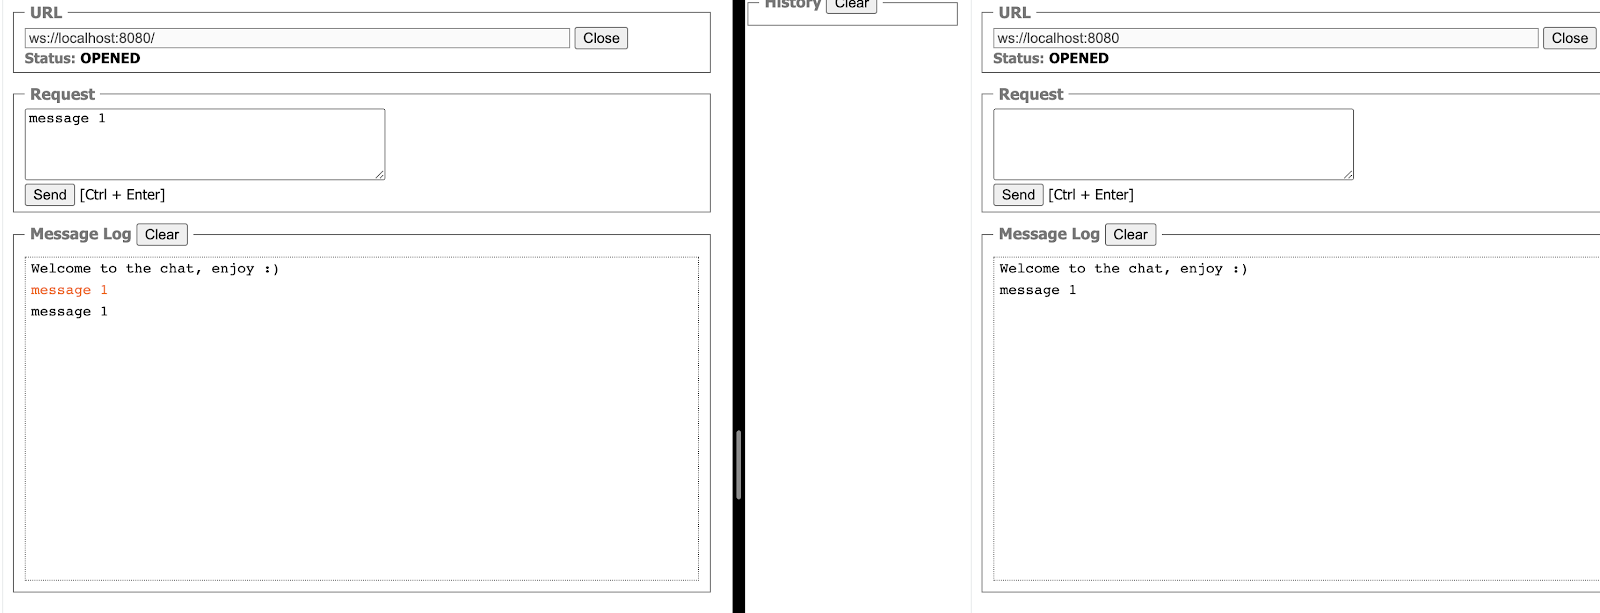
Unfortunately, the message we’ve just sent to others has been also sent to us. We can see that on the left side - the red message is the one we’ve sent and black the received one. Sometimes it’s useful, but in most cases, just not necessary. To prevent it we have to check if the WebSockets instance from the client’s list is different than the instance from the client that sends the message.
if (client !== ws && client.readyState === WebSocket.OPEN)
Thanks to that we will now not receive our own messages.

JSON object
Now we are sending only messages and we do not know who is sending them. We could do some convention and, for example, at the beginning of the message, we will place the name of the author, add some separator, and then the message. The payload would look like
User 1;This is my message text
But what if someone will have our separator in the name? This may break the message in our application. Here comes a good practice with using JSON objects. Thanks to that we will create a structure that is used in our application. Since we are sending strings, JavaScript is helping us with this because we can easily save our object as a JSON string and recover objects from JSON strings thanks to JSON.stringify and JSON.parse.
We just have to check in our server if the message from the clients is a valid JSON string. We can achieve that by parsing it and saving to a variable
let message;

try {
  message = JSON.parse(data);
} catch (e) {
  sendError(ws, 'Wrong format');

  return;
}

const sendError = (ws, message) => {
  const messageObject = {
    type: 'ERROR',
    payload: message,
  };

  ws.send(JSON.stringify(messageObject));
};
This will convert data to JS object and if an error appears it will inform the client about it.
You’ve probably noticed that we have a structure of the JSON object sent to the client. This kind of structure can help you in the future when you will add a new feature. We will also use it in the next steps.
Type will notify us about the kind of message we can expect to receive and payload is a place where we will attach our content.
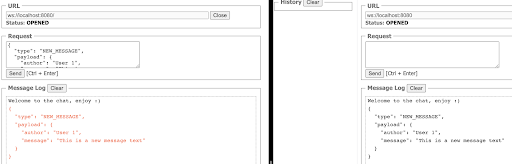
Since we require a JSON now, we can easily determine what data is sent to us. The new incoming message will look like this:
{
  "type": "NEW_MESSAGE",
  "payload": {
    "author": "User 1",
    "message": "This is a new message text"
  }
}
Now we know what kind of message we received - it is a NEW_MESSAGE and that enables us to propagate only new messages instead of sending to others everything.
Let’s move to checking the type. If this is equal NEW_MESSAGE we will send the message to others.
if (message.type === 'NEW_MESSAGE') {
  wss.clients.forEach((client) => {
    if (client !== ws && client.readyState === WebSocket.OPEN) {
      client.send(data);
    }
  });
}
Our application should look like this:
import WebSocket from 'ws';

const wss = new WebSocket.Server({
  port: 8080,
});

wss.on('connection', (ws) => {
  ws.send('Welcome to the chat, enjoy :)');

  ws.on('message', (data) => {
    let message;

    try {
      message = JSON.parse(data);
    } catch (e) {
      sendError(ws, 'Wrong format');

      return;
    }

    if (message.type === 'NEW_MESSAGE') {
      wss.clients.forEach((client) => {
        if (client !== ws && client.readyState === WebSocket.OPEN) {
          client.send(data);
        }
      });
    }

  });
});

const sendError = (ws, message) => {
  const messageObject = {
    type: 'ERROR',
    payload: message,
  };

  ws.send(JSON.stringify(messageObject));
};
Thereby we have a basic WebSocket server with chat. You can create a frontend for it choosing whatever framework or lib you like. Since we used the node’s native WebSockets implementation we are able to use our browsers websockets.
Powerful yet easy
There are different libraries for WebSockets that you can use like socket.io or autobahn but some of them require a special client library like socket.io or autobahn. Some of them may fit your purpose and some may not be a good options, I would recommend to read the documentation or just check in Google if the library of your choice is a good solution for your problem.
WebSocket is a truly powerful and helpful tool for building an application based on real-time communication. What’s more, applying it in Node.js is very easy and you can use a library that does not require any other packages in your frontend application as browsers have it already built-in.


Navigate the changing IT landscape
Some highlighted content that we want to draw attention to to link to our other resources. It usually contains a link .
.svg)
.svg)
.svg)
.avif)

.avif)
.avif)
.avif)