.svg)
.webp)
Even though backend developers in Merixstudio have their hands full they still find some time to contribute to the programming community by preparing open-source solutions like django-trench and run some extra, noncommercial projects. Some time ago we decided to practice our skills and challenge one of the biggest internet problems - hate speech. We have created a detector which would help a little bit to deal with the problem by using machine learning technology. We've built an elementary ML model, implement it with Django and Django Rest Framework, using celery, which we choose mostly for two reasons: automatizing the learning and making the hard work asynchronously in the background so the server won’t overload. Check how exactly we have it done.
Building your Machine Learning model
Our ML model is going to be a linear classifier of hate speech based on thousands of tweets as an example. At the end we want to predict (the result won’t ever be 100% accurate) if a phrase could be classified as a hate speech, no matter of the reason: racism, sexism, offensive language, etc.
The first thing we should do is to create an environment with the libraries necessary to create our classifier. You can choose any of them, I am going to use docker for this and the Django part, and finally, we will receive a unique container for both applications.
Our first requirements for the ML part will be:
nltk==3.4
numpy==1.15.4
matplotlib==3.0.2
pandas==0.23.4
scipy==1.1.0
scikit-learn==0.20.0
stemming==1.0.1
wordcloud==1.5.0
We are going to create an object that will be shared globally so we have our classifier ready to train and predict.
import pandas as pd
import numpy as np

import warnings

from django.core.cache import cache

from os import path
from sklearn.feature_extraction.text import TfidfVectorizer
from sklearn.linear_model import LogisticRegression
from sklearn.model_selection import train_test_split
from sklearn.metrics import f1_score
from sklearn.externals import joblib

from .utils import clean_and_tokenize_tweets


warnings.filterwarnings("ignore", category=DeprecationWarning)
warnings.filterwarnings("ignore", category=FutureWarning)


class Classifier:

    model_filename = '/code/hate_speech_AI/model-cache/cache.pkl'
    model_cache_key = 'model_cache'
    model_rel_path = "hate_speech_AI/model-cache/cache.pkl"

    vectorizer_filename = '/code/hate_speech_AI/vectorizer-cache/cache.pkl'
    vectorizer_cache_key = 'vectorizer_cache'
    vectorizer_rel_path = "hate_speech_AI/vectorizer-cache/cache.pkl"

    score_cache_key = 'score_cache'

    def __init__(self):

        # TF-IDF feature matrix
        tfidf_vectorizer = TfidfVectorizer()
        self.tfidf_vectorizer = tfidf_vectorizer
        self.lreg = LogisticRegression()
Now, I will proceed to explain what is in the code and what a vectorizer and a model are in terms of machine learning.
The first thing you can see is the declaration of some variables names and paths. Those paths will be used to save our ML model in a file so we don’t have to create it every time we want to do any action with it. We will also have a cache (in this case we will use Redis, but you’ll find details in the next part dedicated to Django) providing faster access to the model.
Model
In machine learning paradigm, model refers to a mathematical expression of its parameters along with input placeholders for each prediction, class and action for regression, classification and reinforcement categories respectively.
In our case, we are using logistic regression to build the model. It predicts the probability of occurrence of an event by fitting a logistic function to the data.

Read this article about Logistic Regression on machine learning to find out more about it.
For comparison purposes, check this list of all the different models used in machine learning.
Vectorizer
To analyze a preprocessed data, it needs to be converted into features. Depending upon the usage, text features can be constructed using assorted techniques: Bag-of-Words, TF-IDF, and Word Embeddings. In this article, we will be covering only TF-IDF.
TF-IDF (Term Frequency / Inverted Document Frequency) works by penalizing the common words assigning them lower weights while giving importance to words which are rare in the entire corpus but appear frequently in few documents.
Let’s have a look at the important terms related to TF-IDF:
- TF = (Number of times term t appears in a document)/(Number of terms in the document).
- IDF = log(N/n), where, N is the number of documents and n is the number of documents a term t has appeared in.
- TF-IDF = TF*IDF.
You can find more information about this vectorizer in the official documentation of scikit learn.
Now, if you check the code, we will initialize a vectorizer and an object to be used later in the model. Take into account that at the end of this file we initialize the class:
classifier = Classifier()
Cleaning the data
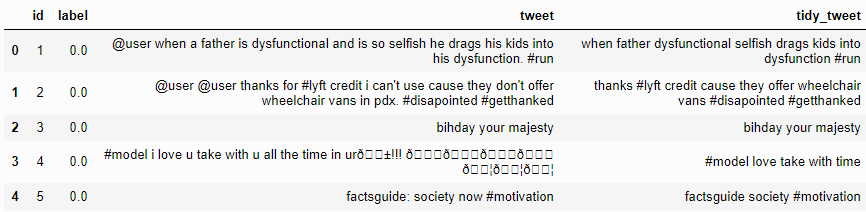
Now that we’ve got our model, we need to train it with large amounts of data.The more of them, the better, because it’s based on statistics. We used about 57k tweets for our project, you can check a list of them which present the posts labeled as an offensive (1) or a non-offensive (0).

First, we have to extract the data from the CSV file:
       # We first train the model at the creation of the model
        train = pd.read_csv('/code/hate_speech_AI/train.csv')
and then prepare them for use in several steps listed below.
- The posts contain lots of twitter handles (@user), which we will remove from the data as they don’t convey much information.
def remove_pattern(input_txt, pattern):
    r = re.findall(pattern, input_txt)
    for i in r:
        input_txt = re.sub(i, '', input_txt)

    return input_txt
Now let’s create a new column tidy_tweet which will contain the cleaned and processed tweets. Note that we have passed “@[\w]*” as the pattern to the remove_pattern function. It is actually a regular expression which will pick any word starting with ‘@’.
def clean_and_tokenize_tweets(data):
    # Data has to be a dict containing tweets
    data['tidy_tweet'] = np.vectorize(remove_pattern)(data['tweet'], "@[\w]*")
- Numbers and special characters do not help much. It is better to remove them from the text just as we did with the twitter handles. Here we will replace everything except characters and hashtags with spaces.
    # remove special characters, numbers, punctuations
    data['tidy_tweet'] = data['tidy_tweet'].str.replace("[^a-zA-Z#]", " ")
- Next, we will get rid of short words but we have to be careful with selecting the length of them. I decided to delete all the words which had 3 letters or less e.g. terms like “hmm” or “oh”. They are of very little use so it is better to remove them from our set.
# remove words with 3 or less character, presumibily not useful
    data['tidy_tweet'] = data['tidy_tweet'].apply(
        lambda x: ' '.join([w for w in x.split() if len(w) > 3])
    )
At this point you can already notice a great difference between the raw tweets and the tidy ones:
- Now we will tokenize all the cleaned tweets in our dataset. Tokens are individual terms or words, and tokenization is the process of splitting a string of the text into the tokens.
    # Tokenize the words for it to use
    tokenized_tweet = data['tidy_tweet'].apply(lambda x: x.split()
- We steam the words and stitch these tokens back together. It is a rule-based process of stripping the suffixes (“ing”, “ly”, “es”, “s” etc) from a word, for example - “play”, “player”, “played”, “plays” and “playing” are the different variations of the word – “play”.
from stemming.porter2 import stem

    # Stem the words. (Stemming is a rule-based process of stripping
    # the suffixes (“ing”, “ly”, “es”, “s” etc) from a word)

    tokenized_tweet = tokenized_tweet.apply(
        lambda x: [stem(i) for i in x]
    )
    for i in range(len(tokenized_tweet)):
        tokenized_tweet[i] = ' '.join(tokenized_tweet[i])
I highly recommend to do this part in some other file like utils.py so in the model we only import. This method will ensure that our code will be cleaner.
def remove_pattern(input_txt, pattern):
    r = re.findall(pattern, input_txt)
    for i in r:
        input_txt = re.sub(i, '', input_txt)

    return input_txt


def clean_and_tokenize_tweets(data):
    # Data has to be a dict containing tweets
    data['tidy_tweet'] = np.vectorize(remove_pattern)(data['tweet'], "@[\w]*")

    # remove special characters, numbers, punctuations
    data['tidy_tweet'] = data['tidy_tweet'].str.replace("[^a-zA-Z#]", " ")

    # remove words with 3 or less character, presumibily not useful
    data['tidy_tweet'] = data['tidy_tweet'].apply(
        lambda x: ' '.join([w for w in x.split() if len(w) > 3])
    )

    # Tokenize the words for it to use
    tokenized_tweet = data['tidy_tweet'].apply(lambda x: x.split())

    # Stem the words. (Stemming is a rule-based process of stripping
    # the suffixes (“ing”, “ly”, “es”, “s” etc) from a word)

    tokenized_tweet = tokenized_tweet.apply(
        lambda x: [stem(i) for i in x]
    )
    for i in range(len(tokenized_tweet)):
        tokenized_tweet[i] = ' '.join(tokenized_tweet[i])

    data['tidy_tweet'] = tokenized_tweet
    return data
Training the model
Once we have our vectorizer and a model initialized, and the data are clean and ready to use, we have to do 3 simple things. First, we will transform the data so the model can understand it, then train the model and lastly dump it to the cache file for further use.
def train_model(self):

        # We first train the model at the creation of the model
        train = pd.read_csv('/code/hate_speech_AI/train.csv')
        # Remove all the unncessary parts in the

        train_data = clean_and_tokenize_tweets(train)
        tfidf = self.tfidf_vectorizer.fit_transform(train_data['tidy_tweet'])

        # Building model using TF-IDF features

        # splitting data into training and validation set
        xtrain_tfidf, xvalid_tfidf, ytrain, yvalid = train_test_split(
            tfidf, train['label'], random_state=42, test_size=0.25,
        )

        self.lreg.fit(xtrain_tfidf, ytrain)
        if not (path.exists(self.model_filename)):
            model_file = open(self.model_filename, 'w+')
            model_file.close()
        if not (path.exists(self.vectorizer_filename)):
            vectorizer_file = open(self.vectorizer_filename, 'w+')
            vectorizer_file.close()
        joblib.dump(self.lreg, self.model_filename)
        joblib.dump(self.tfidf_vectorizer, self.vectorizer_filename)
Let’s go through the train_model method step by step now. We import the data, clean it with our previously created (and imported from utils.py) method, and transform them with our vectorizer so they’re ready to use.
Now is the time for the train_test_split function. It will split the data in 0.75 to train (train set) and 0.25 to validate (validation set) in order to create a score of prediction further in the model.
The fit method step is actually the one which trains the model. It checks the tweets and the label creating a model that will recognize which words are related to the hate speech and which are not.
Finally, we have to check if we have already created the cache.pkl file, and if not, we need to do it. Then we just have to save the information about the vectorizer and trained model.
The score of the model
In every machine learning problem, we have to choose a metric that will tell how well does the model perform on a previously unseen data. In many cases simply measuring accuracy is not enough to adequately distinguish between good model and a bad one. In our example, we will use f1_score defined as:
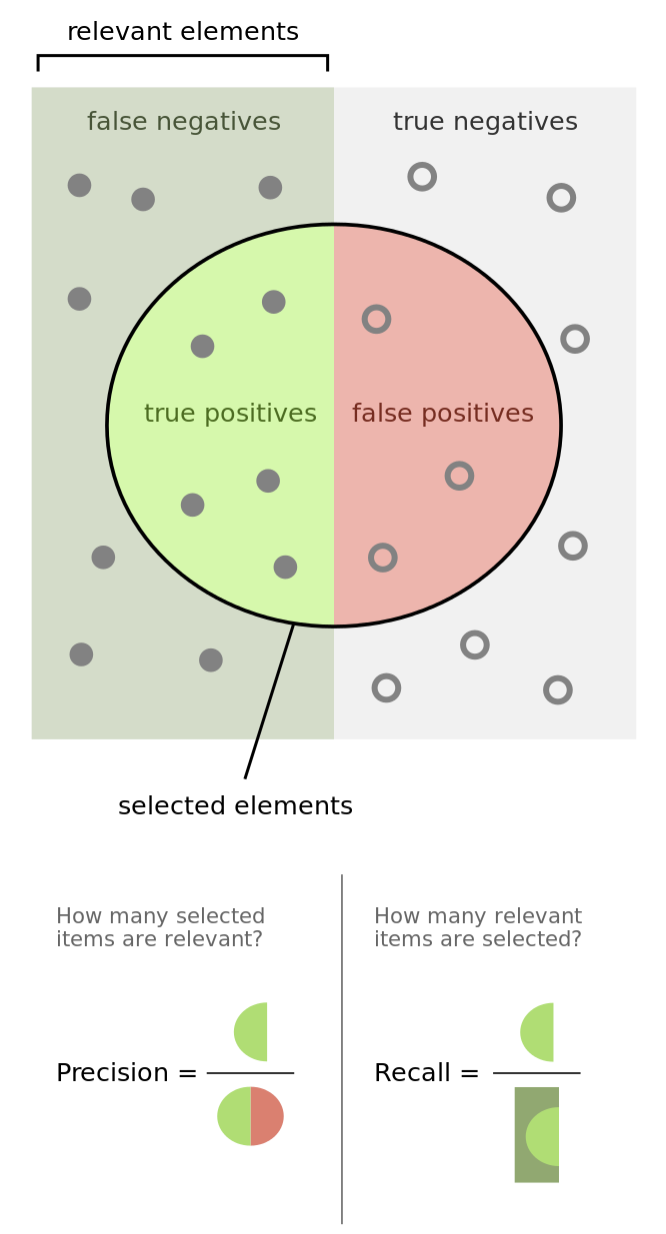

We are going to add a method to the model to check its score, which will show how accurate the predictions are going to be.
        # Get the score of the model
        prediction = self.lreg.predict_proba(xvalid_tfidf)
        prediction_int = prediction[:, 1] >= 0.75
        prediction_int = prediction_int.astype(np.int)

        cache.set(self.model_cache_key, self.lreg, None)
        cache.set(self.vectorizer_cache_key, self.tfidf_vectorizer, None)
        cache.set(self.score_cache_key, f1_score(yvalid, prediction_int), None)

    def get_score(self):
        score = cache.get(self.score_cache_key)
        if score:
            return score
        return 'No score in cache'
After the training (in the same train_model method) we receive the F1 score of the model and set it in the cache so we can just use it with get_score method. This score is based on a statistic algorithm and you can read about it e.g. in its Wikipedia page. You can appreciate that we are measuring quality on a validation set to check how well model generalizes on previously unseen examples. Then we are only getting the probabilities of the prediction to be correct and checking if that probability is >= 0.75. This level of quality enables us getting the F1 score. In our model, we gained a 0.82 F1 score, which is acceptable, but not perfect. To make it better we would need much more data.
Prediction
The last part of our model is going to be the prediction. This is actually the one extensively used in our Django API.
 def predict_single_tweet(self, tweet):
        # return 1 if offensive, 0 if not
        if type(tweet) != str:
            return
        model = cache.get(self.model_cache_key)
        vectorizer = cache.get(self.vectorizer_cache_key)
        if model is None:
            model_path = path.realpath(self.model_rel_path)
            model = joblib.load(model_path)

            # save in django memory cache

            cache.set(self.model_cache_key, model, None)

        if vectorizer is None:
            vectorizer_path = path.realpath(self.vectorizer_rel_path)
            vectorizer = joblib.load(vectorizer_path)

            # save in django memory cache

            cache.set(self.vectorizer_cache_key, vectorizer, None)
        tweet_to_predict = vectorizer.transform([tweet])
        return model.predict(tweet_to_predict)[0]
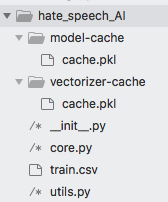
As you can see it is pretty simple since we’ve already prepared everything to make it work as fast as possible, so the users won’t wait too long for a prediction. First, we just get the model and the vectorizer from the cache and if they are not in there, we can use the dump we created at initialization of the model and put it in the cache for further use. Then we just transform the tweet using the vectorizer and return the prediction using the .predict method which our model has already implemented. The structure of your machine learning application should be like this, for now:
And that would be all to create a simple hate speech predictor efficient enough for learning purposes. For a more accurate solution, we would need more significant dataset.
Next step will be to implement our model in a Django project and make an API to share it with the world. Stay tuned - the second part will be published next week!
Like what our developers do? Join our backend team and take part in awesome projects like this one! We’re looking for software developers - check our job offers!


Navigate the changing IT landscape
Some highlighted content that we want to draw attention to to link to our other resources. It usually contains a link .
.svg)
.svg)
.svg)
.avif)

.avif)
.avif)
.avif)