In the previous part of this article we learned the basics of Wagtail CMS and created a simple showcase application. This time we will focus on extending Wagtail’s functionality by adding the possibility to manage multi-language content.
Integrating translation module with Wagtail
At first, we should install modelstranslation via pip:
$ pip install django-modeltranslation
You can find a detailed documentation HERE.
In this article I will only cover crucial parts of this application.
Let us add modeltranslation to INSTALLED_APPS tuple in our project’s settings:
    INSTALLED_APPS = (
        …
        'modeltranslation',
    )
If you have not done it yet, set which languages you are going to use:
    LANGUAGES = (
        ('pl', 'Polski'),
        ('en', 'English'),
        ('de', 'Deutsch'),
    )
Now we should register our models with modeltranslation. Create a new file called translation.py in the gallery application:
    from modeltranslation.translator import register, TranslationOptions

    from wagtail.wagtailcore.models import Page

    from .models import PhotoPage, GalleryPage


    @register(Page)
    class PageTranslationOptions(TranslationOptions):
        fields = ('title', 'slug')
        required_languages = ('pl',)


    @register(PhotoPage)
    class PhotoPageTranslationOptions(TranslationOptions):
        fields = ('header', 'abstract', 'description')
        required_languages = ('pl',)


    @register(GalleryPage)
    class GalleryPageTranslationOptions(TranslationOptions):
        fields = ('description',)
        required_languages = ('pl',)
The code is pretty straightforward - while using the @register decorator we are selecting the model we want to register for translation. Then we provide the list of fields that ought to be translated. Optionally we can explicitly declare which language version should be the default one. Because some of our fields are not nullable (nor accept empty strings) we should specify at least one language here - in our case it will be Polish.
Now we need to update our database:
    $ python manage.py makemigrations
    $ python manage.py migrate
In the migration files we can see that modeltranslation created extra fields, e.g. title_pl, title_en etc. We will use this information in further work.
Let us create a custom panel - it'job will be to handle translatable fields in the admin panel. Add a new file called edit_handlers.py in our gallery app and place in it the following classes:
    from django.conf import settings

    from wagtail.wagtailadmin.edit_handlers import BaseCompositeEditHandler, FieldPanel

    class BaseTranslationEditHandler(BaseCompositeEditHandler):
        template = 'edit_handlers/translation_panel.html'

    class TranslationPanel:
        def __init__(self, field_name, heading="", classname=""):
            self.heading = heading
            self.classname = classname
            self.field_name = field_name
            self.children = []
            self.lang_codes = []

            for lang_code in dict(settings.LANGUAGES):
                field = FieldPanel('{}_{}'.format(field_name, lang_code))
                self.children.append(field)
                self.lang_codes.append(lang_code)

        def bind_to_model(self, model):
            return type('TranslationPanel', (BaseTranslationEditHandler,), {
                'model': model,
                'children': [child.bind_to_model(model) for child in self.children],
                'heading': self.heading,
                'classname': self.classname,
                'lang_codes': self.lang_codes,
                'field_name': self.field_name
            })
This component will allow us to add translated fields to the admin panel in the similar way to the FieldPanel, e.g. TranslationPanel(‘title’). It will automatically handle all the languages declared in project settings.
The reason we override BaseTranslationEditHandler is that we want to make it use our custom template to render the widget. Add it in gallery/templates/edit_handlers directory and call the file translation_panel.html:
    <h2>
        <label>
            {{ self.field_name }}
        </label>
    </h2>

    <fieldset>
        <legend>{{ self.heading }}</legend>
        <div class="translation-tabs">
            <ul>
                {% for lang_code in self.lang_codes %}
                    <li>
                        <a href="#tab-{{ self.field_name }}-{{ forloop.counter }}">{{ lang_code }}</a>
                    </li>
                {% endfor %}
            </ul>
            {% for child in self.children %}
                <div id="tab-{{ self.field_name }}-{{ forloop.counter }}">
                    {{ child.render_as_field }}
                </div>
            {% endfor %}
        </div>
    </fieldset>
In order to override the default panel used by Page objects we need to subclass it. Add the following code to gallery/models.py:
    class TranslatedPage(Page):
        content_panels = [
            TranslationPanel('title'),
        ]

        promote_panels = [
            TranslationPanel('slug')
        ]

        class Meta:
            abstract = True
Also, we should change our PhotoPage and GalleryPage models:
    from .edit_handlers import TranslationPanel

        …

    class PhotoPage(TranslatedPage):
        ...

        content_panels = TranslatedPage.content_panels + [
            TranslationPanel('header'),
            FieldPanel('date'),
            ImageChooserPanel('image'),
            TranslationPanel('abstract'),
            TranslationPanel('description'),
        ]


    class GalleryPage(TranslatedPage):
        ...

        content_panels = TranslatedPage.content_panels + [
            TranslationPanel('description')
        ]
As you can see, the only differences are in the base class and translated fields’ panels.
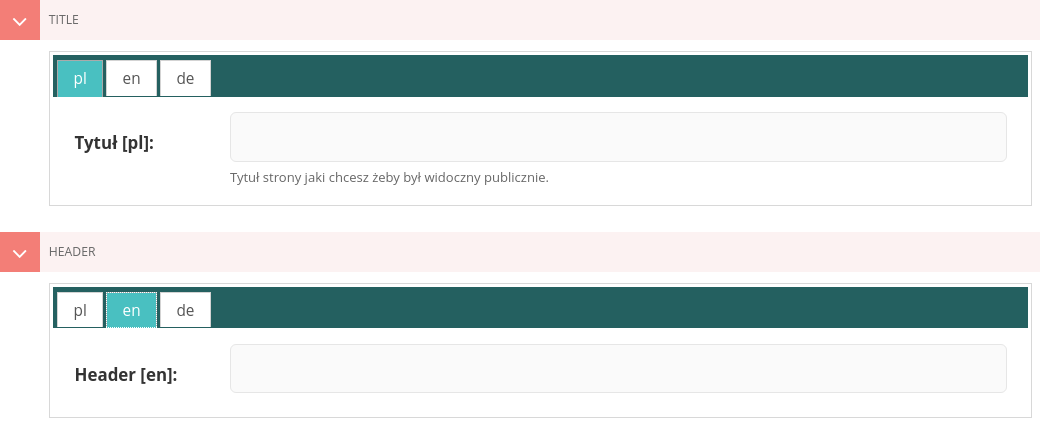
As of now, the functionality works just fine - we can see how the admin panel changed. Instead of one field we can now edit its various language versions. However, managing more languages in more advanced pages would quickly become cumbersome. To make the interface a bit more friendly for the editors we have to use jQuery UI tabs.
Customizing the widget with jQuery and jQuery UI
jQuery and jQuery UI are already included in Wagtail admin pages, so there is no need to import them. Let us create a new template in <project_name>/templates/wagtailadmin directory (it is not there by default, so you need to create it) and call it base.html.
    {% extends "wagtailadmin/base.html" %}

    {% block extra_js %}
        {{ block.super }}
        <script type="text/javascript">
            $(function(){
                $('.translation-tabs').tabs();
            });
        </script>
    {% endblock extra_js %}
In the similar fashion we can add custom CSS to admin panel - just override extra_css block and link your files there.
Here is what it should look like from editor’s point of view:

Lastly, we need to give the users a possibility to view different language versions of our application. In order to do it, we need to slightly change our root urls.py file
    from django.conf.urls.i18n import i18n_patterns

        …

    urlpatterns = [
        url(r'^django-admin/', include(admin.site.urls)),

        url(r'^admin/', include(wagtailadmin_urls)),
        url(r'^documents/', include(wagtaildocs_urls)),

        url(r'^search/$', search_views.search, name='search'),
    ]

    urlpatterns += i18n_patterns(
        url(r'', include(wagtail_urls)),  # move this line from urlpatterns list
    )
Now we have to add locale middleware in our settings file:
    MIDDLEWARE_CLASSES = (
        …
        'django.middleware.locale.LocaleMiddleware',
    )
Specific language version can now be accessed via urls
- http://127.0.0.1/en/gallery for english version,
- http://127.0.0.1/pl/gallery for polish version.
Alternative tools
Django CMS may be a good choice for people with Wordpress background. It has a handy interface which allows editors to change content while viewing the rendered page, thanks to which they will immediately see the changes being implemented live. Django CMS is provided with a built-in module for managing multi-language sites. On the downside, it gives an impression of being slow and designed to support big websites rather than a simple blog like the one we created.
The other alternative tool is Mezzanine, which is a less popular than Django CMS. It allows editors to change content not only in the admin panel, but also in the live preview of a page. However, its default admin interface is not much more complex than Django’s.
What have we learned?
In this article we learned how to extend Wagtail’s functionality by making our application multilingual. We used third party Django application and without much of a hassle integrated it with Wagtail. The ability to adapt the CMS to specific needs in an easy way is one of Wagtail’s strength and makes it the perfect tool to quickly create full-fledged web applications that are easy to use for both users and content editors.
Navigate the changing IT landscape
Some highlighted content that we want to draw attention to to link to our other resources. It usually contains a link .
.svg)


.webp)


.svg)


.svg)
